Mirantis Lens Adds Extension API, Offering Seamless Integration with any Kubernetes Integrated Component, Toolkit, or Service

The post Mirantis Lens Adds Extension API, Offering Seamless Integration with any Kubernetes Integrated Component, Toolkit, or Service appeared first on Mirantis | Pure Play Open Cloud.
Mirantis Lens Adds Extension API, Offering Seamless Integration with any Kubernetes Integrated Component, Toolkit, or Service

World’s most popular Kubernetes IDE provides a simplified, consistent entry point for developers, testers, integrators, and DevOps, to ship code faster at scale

Campbell, CA, November 12, 2020 — Mirantis, the open cloud company behind the popular Lens Kubernetes IDE project, today announced a new Extensions API, enabling rapid development of extensions for seamless integration with any Kubernetes integrated component, toolkit, or service. In conjunction with the announcement, Mirantis and makers of many popular CNCF projects announced Lens extensions.

The Extensions API and first batch of Extensions are expected to be generally available around KubeCon Virtual North America 2020, but are already available for partners.

The world’s most popular Kubernetes integrated development environment (IDE) with more than one million downloads, Lens provides developers with a cloud native IDE that contains all the popular development tools. The Extension API and Extensions made in collaboration with many popular CNCF projects, opens up the world to Kubernetes developers greatly simplifying creating, shipping, and running cloud-native applications.

Download Lens from the project website https://k8slens.dev. 

Using Lens Extensions, users can add custom visualizations and functionality to support their preferred cloud native technologies and to accelerate their development workflows. The extensions API will provide a wide array of options for extension authors to plug directly into the Lens IDE. Extensions can also be used in conjunction with services deployed from the Helm chart repository for a fully integrated experience.

“Extensions API will unlock collaboration with technology vendors and transform Lens into a fully featured cloud native development IDE that we can extend and enhance without limits,” said Miska Kaipiainen, co-founder of Lens OSS project and senior director of Engineering at Mirantis. “If you are a vendor, Lens will provide the best channel to reach tens of thousands of active Kubernetes developers and gain distribution to your technology in a way that did not exist before. At the same time, the users of Lens enjoy quality features, technologies and integrations easier than ever.” 

Several partners in the Lens ecosystem today announced support for Lens extensions: Kubernetes security vendors Aqua and Carbonetes, API gateway maker Ambassador Labs (formerly Datawire), and AIOps pioneer Carbon Relay. Other partners are actively building extensions including nCipher (hardware-based key management), API gateway maker Kong, and container security solution provider StackRox. Hear more from partners here.

“Introducing an extensions API to Lens is a game-changer for Kubernetes operators and developers, because it will foster an ecosystem of cloud-native tools that can be used in context with the full power of Kubernetes controls, at the user’s fingertips,” said Viswajith Venugopal, StackRox software engineer and developer of KubeLinter. “We look forward to integrating KubeLinter with Lens for a more seamless user experience.”

“Kubernetes is an amazingly powerful technology, but it’s complex,” said Daniel Terry, lead designer, SEB Bank, Sweden. “This can be challenging for developers whose priorities are to ship code as fast as possible, not manage infrastructure. At SEB, we believe that Lens will help our developers overcome this challenge, simplifying Kubernetes and driving results for both novices and experts. We’re excited that the extensions in Lens 4.0 will enable other Kubernetes related services to integrate smoothly across the full Lens user experience, making the Kubernetes journey for our developers much easier.” 

Key Features at a Glance

Easiest Way to Run Kubernetes. Learn by Doing: Lens installs anywhere, eliminates the need to wrangle credentials, and provides an intuitive, clean user interface that hides kubectl complexity and coordinates access to code editors, version control, the Docker CLI, and other desktop and remote tools. Thanks to the intuitive interface, novices can quickly and safely learn and get up to speed working with the Kubernetes architecture without being overwhelmed by complexity. Power users have productivity but with full granular control, when they need it.
Unified, Secure, Multi-cluster Management On Any Platform: Lens provides agentless read and write management for any number of Kubernetes clusters from an intuitive desktop application. Clusters can be local (e.g. minikube) or external (e.g. Mirantis Kubernetes Engine, EKS, AKS, GKE, Pharos, UCP, Rancher, Tanzu or OpenShift) and are added simply by importing the kubeconfig with cluster details. RBAC security is preserved, as Lens uses the standard kubectl API.
Observability and Remediation: Lens provides the insight and ability to go from observation to actionable in the fastest way possible. Users see all relevant graphs and resource utilization charts integrated into the dashboard via Prometheus. When there is an alert the user clicks on it to get detailed status, consumption, and configuration on the pod in question. The user can then immediately access the logs to search for error messages and if needed one-click to get a terminal session to take any actions.
Helm Chart Service Deployment: Users can quickly search or browse Helm charts for kubernetes-deployable services. Once chosen a one-click install button deploys the Helm chart to the currently selected Kubernetes cluster. Services can be upgraded with a single click when new versions are available. 

Join the Lens Family on Slack: k8slens.slack.com.
The post Mirantis Lens Adds Extension API, Offering Seamless Integration with any Kubernetes Integrated Component, Toolkit, or Service appeared first on Mirantis | Pure Play Open Cloud.
Quelle: Mirantis

How the Lens Extension API lets you add on to an already great Kubernetes IDE

The post How the Lens Extension API lets you add on to an already great Kubernetes IDE appeared first on Mirantis | Pure Play Open Cloud.
You may already know Lens as the Kubernetes IDE that makes it simple for developers to work with Kubernetes and Kubernetes objects, but what if you could customize it for the way you work and what information you see from your cluster?

Today we’re announcing Lens 4.0 and the Lens Extensions API, which lets you quickly code lightweight integrations that customize Lens for your own tools and workflows. The  REACT.js-based Extensions API enables extensions to work through the Lens user interface, leverage Lens’ ability to manage access and permissions, and automate around Helm and kubectl. 

The Extensions API makes it possible to add new tabs and screens to Lens, and to work with custom resources, so you can do things like integrate your own CI/CD workflows, databases, and even your own internal corporate applications, to speed your workflow.

But you don’t have to build your own extensions to benefit from the API, because partners in the Lens and Kubernetes ecosystems are already building their own integrations that enable you to use their products with Lens.  By extending Lens to show information beyond the core Kubernetes constructs we’re able to build more comprehensive situational awareness and help Kubernetes users get more value out of their clusters.

Many of the extensions announced today revolved around improving security.  For example, Aqua’s Starboard project brings security information natively into Kubernetes in the form of custom resources. By extending Lens to display these resources, the integration makes security information easily accessible and actionable for Kubernetes users. 

“Aqua’s open source project Starboard makes security reports from a variety of tools and vendors available as Kubernetes-native resources,” said Liz Rice, VP Open Source Engineering, Aqua Security. “The new Lens API allows us to make such security information accessible to developers within their IDE, giving them immediate and actionable information about potential security risks in their K8s deployment, in an approach that’s true to DevSecOps principles.”

Carbonetes evaluates your code for risks (vulnerabilities, SCA, licenses, bill of materials, malware, and secrets), compares those results against company policy, and recommends the most efficient fix. Carbonetes integrates seamlessly into your CI/CD pipeline with plug-ins, enabling full automation.

“Carbonetes is excited to provide enhanced security insights in conjunction with Lens’ amazing cluster monitoring platform,” said Mike Hogan, CEO of Carbonetes, “In addition to addressing compliance and security risks in runtime clusters, Carbonetes streamlines the process of building new and more secure containers, protecting your cluster against stale images, outdated open source tools, policy drift, and more.”

Thanks to the Extensions API, Lens will even help you with projects that rely on specialized hardware.  Entrust hardware security modules are hardened devices designed to safeguard and manage cryptographic keys. Validated to FIPS 140-2 level 3 and Common Criteria EAL4+ and offered as on-premises appliance, or as a service, nShield delivers enhanced key generation, signing, and encryption to protect sensitive containerized data and transactions.

“Having recently completed the integration and certification of our FIPS-validated nShield hardware security modules (HSMs) with the [Mirantis Kubernetes Engine (formerly Docker Enterprise)] container platform from Mirantis, Entrust looks forward to continuing the development of our high assurance security solutions to provide developers not only quick and easy access to cryptographic capabilities, but also greater visibility over their Kubernetes cluster deployments,” said Tony Crossman, Director of Business Development at Entrust. “Entrust nShield is the first certified HSM in the market to deliver enhanced security to the Docker Enterprise container platform. The new certified integration provides a root of trust, enabling developers to add robust cryptographic services offered by Entrust nShield HSMs to containerized applications.”

That’s not to say that the Lens Extension API is only for security issues.  For example, Kong Enterprise is a service connectivity platform that provides technology teams at multi-cloud and hybrid organizations the “architectural freedom” to build APIs and services anywhere. 

Kong’s service connectivity platform provides a flexible, technology-agnostic platform that supports any cloud, platform, protocol and architecture. Kong Enterprise supports the full lifecycle of service management, enabling users to easily design, test, secure, deploy, monitor, monetize and version their APIs.

A Kong Lens extension would enable admins to better control and manage all Kubenetes objects under Kong’s domain. For example, the plugin will provide a visual representation of all dependencies a given Kubernetes Ingress has in terms of Kong policies.

The Extensions API lets you focus on the user experience.  For example, integrated KubeLinter static analysis for YAML files and Helm charts, combined with StackRox Kubernetes-native security info, policies, and recommendations, provides Lens users powerful security tools that always stay in context across their clusters.

“Introducing an Extensions API to Lens is a game-changer for Kubernetes operators and developers, because it will foster an ecosystem of cloud-native tools that can be used in context with the full power of Kubernetes controls at the users’ fingertips,” said Viswajith Venugopal, StackRox software engineer and lead developer of KubeLinter. “At StackRox, we initiated the open source project KubeLinter to help incorporate production-ready policies into developer workflows when working with Kubernetes YAMLs and Helm charts, and we look forward to integrating KubeLinter with Lens for a more seamless user experience.”

StackRox delivers the industry’s first Kubernetes-native security platform that enables organizations to secure their cloud-native apps from build to deploy to runtime.

The StackRox Kubernetes Security Platform leverages Kubernetes as a common framework for security controls across DevOps and Security teams. KubeLinter, a new open source static analysis tool recently launched by StackRox, helps Kubernetes users identify misconfigurations in their deployments.

The Extensions API is also helping Ambassador Labs to improve your ability to use Lens for one of it’s greatest strengths: troubleshooting.  “We are thrilled to partner with Mirantis on a Telepresence plugin for Lens. With Lens and Telepresence, users will be able to quickly code, debug, and troubleshoot cloud-native applications on Kubernetes faster than ever before,”  Ambassador CEO Richard Li said.

Ambassador Labs makes the popular open source projects Kubernetes Ambassador Edge Stack and Telepresence. The plug-in integrates Telepresence with Lens, making it possible for Kubernetes developers to quickly and easily test changes to their Kubernetes services locally while bridging to a remote Kubernetes cluster.

Extensions are even enabling Lens to branch out into machine learning-enabled optimization.  

“Carbon Relay is thrilled to be the Kubernetes Optimization partner of choice for Lens. The Lens IDE enables users to easily manage, develop, debug, monitor, and troubleshoot their apps across a fleet of Kubernetes clusters on any infrastructure. We extend upon the Lens IDE by delivering machine learning-powered optimization, affording users performance reliability and cost-efficiencies without sacrificing scale.” Joe Wykes, Chief Sales Officer for Carbon Relay said.

Carbon Relay combines cloud-native performance testing with machine learning-powered optimization, and the Carbon Relay platform helps DevOps teams build optimization into their CI/CD workflow to proactively ensure performance, reliability, and cost-efficiency.

As you can see, Lens is branching out, and fast!  If you haven’t tried it yet, you can get it here. If you are already a Lens user, you are probably thinking about how you can use the Extensions API to your advantage (aside from bugging your favorite vendors to build their own plugins).  If so, watch this space for instructions on building your own Lens plugin! The post How the Lens Extension API lets you add on to an already great Kubernetes IDE appeared first on Mirantis | Pure Play Open Cloud.
Quelle: Mirantis

Congratulations to the K0s team on their new Kubernetes distribution!

The post Congratulations to the K0s team on their new Kubernetes distribution! appeared first on Mirantis | Pure Play Open Cloud.
We’ve got a lot going on here at Mirantis, and one thing that’s flown under the radar is the K0s project, a real game-changer of a small, fast, robust, easy-to-use Kubernetes distribution.

As Adam Parco said on his blog (and believe me, he’s excited about this!):  “It is created by the team behind Lens, the Kubernetes IDE project. This new open source project is the spiritual successor to the Pharos Kubernetes distro that was also developed and maintained by the team. I like to say that k0s does for Kubernetes what Docker did for containers.”

We’ll be talking more about K0s in the days to come, but in the meantime we wanted to extend our heartiest congratulations to the team that has worked so hard on it!The post Congratulations to the K0s team on their new Kubernetes distribution! appeared first on Mirantis | Pure Play Open Cloud.
Quelle: Mirantis

Enhancing our privacy commitments to customers

Around the world, companies in every industry rely on our cloud services to run their businesses, and we take that responsibility seriously. That’s why we’re focused on providing industry-leading security and product capabilities, certifications, and commitments, along with transparency and visibility into when and how customer data is accessed. Today, we’re expanding on these commitments and sharing an update on our latest work in this area. Commitment to privacy Our Google Cloud Enterprise Privacy Commitments outline how we protect the privacy of customers whenever they use Google Workspace, G Suite for Education and Google Cloud Platform (GCP). There are two distinct types of data that we consider across both of these platforms—customer data and service data:Customer data: We start from the fundamental premise that, as a Google Cloud customer, you own your customer data. We implement stringent security measures to safeguard that data, and provide you with tools to control it on your terms. Customer data is the data you, including your organization and your users, provide to Google when you access Google Workspace, G Suite for Education and GCP, and the data you create using those services.Service data: We also secure any service data—the information Google collects or generates while providing and administering Google Workspace, G Suite for Education and GCP—which is critical to help ensure the security and availability of our services. Service data does not include customer data—it includes information about security settings, operational details, and billing information. We process service data for the purposes that are detailed in our Google Cloud Privacy Notice (newly launched to provide more specific information about how we process service data, and effective November 27, 2020), such as making recommendations to optimize your use of Google Workspace and GCP, and improving performance and functionality.When you use Google Cloud services, you can be confident that:You control your data. Customer data is your data, not Google’s. We only process your data according to your agreement(s). We never use your data for ads targeting. We do not process your customer data or service data to create ads profiles or improve Google Ads products.We are transparent about data collection and use. We’re committed to transparency, compliance with regulations like the GDPR, and privacy best practices.We never sell customer data or service data. We never sell customer data or service data to third parties.Security and privacy are primary design criteria for all of our products. Prioritizing the privacy of our customers means protecting the data you trust us with. We build the strongest security technologies into our products.These commitments are backed by the strong contractual privacy commitments we make available to our customers for Google Workspace, G Suite for Education and GCP. Enhanced customer controls and new third party certificationsWe recently released new capabilities that further improve visibility and control over how data in our cloud is accessed and processed. In 2018, we were the first major cloud provider to bring Access Transparency to our customers, providing you with near real-time logs of the rare occasions Google Cloud administrators access your content. To give you even more visibility and control, we’ve made Access Approval for GCP generally available to let you approve or dismiss requests for access by Google employees working to support your service. Our Transparency & Control Center is also now generally available as part of the GCP Console. It gives you the ability to enable and disable data processing that supports features such as recommendations and insights at the organization and project level. It also allows you to export personal data that may be used to generate recommendations and insights. For Google Workspace, in addition to providing granular audit logs, we offer organization admins and users the ability to download a copy of their data via the data export tool and Google Takeout. These are just some of the ways we help support data portability requirements under privacy regulations such as the EU’s GDPR and the California Consumer Privacy Act (CCPA).We continue to reinforce our commitment to privacy by meeting the requirements of internationally-recognized privacy laws, regulations, and standards. This summer we announced that we are the first major cloud provider and productivity suite to receive accredited ISO/IEC 27701 certification as a data processor. Ouraccredited ISO/IEC 27701 certifications for Google Workspace and GCP provide customers with benefits including simplified audit processes, universal privacy controls and greater clarity around privacy-related roles and responsibilities. Certifications provide independent validation of our ongoing dedication to world-class security and privacy, and we look forward to obtaining additional certifications in the future. Continued innovation to support customer needsAs the global privacy landscape and our customers’ needs change, Google Cloud will continue to work diligently to maintain our commitments to privacy, control and transparency. To learn more about our efforts, visit our Trust and Security center.
Quelle: Google Cloud Platform

Accelerating cloud migrations with the new Database Migration Service

Enterprises across all industries are answering the call to move their business infrastructure, and with that their databases, to the cloud. They are flocking to fully managed cloud databases like Cloud SQL to leverage their unparalleled reliability, security, and cost-effectiveness. Today, we’re launching the new serverless Database Migration Service (DMS) as part of our vision at Google Cloud for how to meet those modern needs in a way that’s easier, faster, more predictable, and more reliable. We know that database migrations can be a challenge for enterprises. That’s why we give our customers a uniquely easy, secure, and reliable experience with DMS. We worked with dozens of customers around the world, including Samsung Electronics, Adwerx, Affle, Cirruseo (Accenture), Guichê Virtual, and Ryde, to successfully migrate their production databases with minimal downtime using DMS. So, what is it exactly that makes DMS different? Simple experience: “I have a hard time imagining a migration process being easier,” says Josh Bielick, VP of Infrastructure at Adwerx. Migrations shouldn’t be a headache to set up, nor require independent research or searching through documentation. Preparing databases for replication, configuring secure source connectivity, and validating migration setup is baked right into DMS, making the setup clear, fast, and repeatable.Minimal downtime: Application uptime is key to keeping your business running. Every migration with DMS can replicate data continuously from source database to destination without cumbersome manual steps, minimizing database downtime and enabling fast application cutover. “At Ryde, our ride-sharing app users are always active. When we made the decision to move to Google Cloud, we needed a way to migrate our production databases from Amazon RDS to Cloud SQL. Database Migration Service made this simple, and we were able to complete the migration in less than a day, with minimal disruption to our users,” says Nitin Dolli, CTO, Ryde Technologies. “Now that we’re fully migrated to Cloud SQL, we no longer need to worry about scaling, maintenance, or other operations as we continue to grow. We can just focus on building robust applications.” Reliable and complete: Migrations need to be high-fidelity, so the destination database just works. For like-to-like migrations across compatible source and destination database engines, DMS is unique among migration services because it uses the database’s native replication capabilities to maximize fidelity and reliability. Serverless and secure: Migrations just work, at scale, in a serverless fashion. With DMS, there’s no hassle of provisioning or managing migration-specific resources, or monitoring them to make sure everything runs smoothly. For sensitive data, DMS also supports multiple secure private connectivity methods to protect your data during migration.DMS provides a fast and seamless migration to Cloud SQL, the fully managed database service for MySQL, PostgreSQL, and SQL Server. By migrating to Cloud SQL, you not only benefit from its enterprise-grade availability, security, and stability, but you also get unique integrations with the rest of Google Cloud, including Google Kubernetes Engine and BigQuery. “We needed to create live dashboards built on top of BigQuery that pulled data from both on-premises and cloud sources. Google Cloud’s Database Migration Service made this easy for us,” says Sofiane Kihal, Engineer, Cirruseo (Accenture). “Using its continuous replication, we were able to migrate data to Cloud SQL and then query directly using federation from BigQuery. Additionally, using Cloud SQL as a managed service for MySQL has allowed us to reduce the time we spend on operations by over 75%.”How does Database Migration Service work?DMS provides high-fidelity, minimal downtime migrations for MySQL and PostgreSQL workloads. We designed it to be truly cloud-native—built by and for the cloud. DMS utilizes log shipping to replicate data at super-low latencies from the source database to the destination. It streams the initial snapshot of data, then catches up and continuously replicates new data as it arrives in the source.The source and destination are continuously up to date because they rely on the databases’ own native replication capabilities. This replication technique maximizes the fidelity of data transferred with very low latency. That means you can decide when you’re ready to promote your database, then just point your application to Cloud SQL as the primary database, with minimal downtime. DMS is serverless, so you never have to worry about provisioning, managing, or monitoring migration-specific resources. The source database’s data, schema, and additional database features (triggers, stored procedures, and more) are replicated to the Cloud SQL destination reliably, and at scale, with no user intervention required.Getting started with Database Migration ServiceYou can start setting up a migration to Cloud SQL for MySQL with DMS today. Head over to the Database Migration area of your Google Cloud console, under Databases, and click Create Migration Job. There you can:Initiate migration creation, and see what actions you need to take to set up your source for successful migration.Define your source, whose connectivity information is saved as a connection profile you can re-use for other migrations. Create your destination—a Cloud SQL instance, right-sized to fit your source data and optimize your costs.Define the connectivity method, with both private and public connectivity methods supported to suit your business needs.Test your migration job to ensure it will be successful when you’re ready to go.Once your migration job runs and the source and destination are in sync, you’ll be ready to promote and use your new Cloud SQL instance!Learn more and start your database journey  DMS, now in Preview, supports migrations of self-hosted MySQL databases, either on-premises or in the cloud, as well as managed databases from other clouds, to Cloud SQL for MySQL. Support for PostgreSQL is currently available for limited customers in Preview, with SQL Server coming soon (request access for both). You can get started with DMS for native like-to-like migrations to Cloud SQL at no additional charge. For more resources to help get you started on your migration journey, read our blog on migration best practices, or head on over to the DMS documentation.Customer stories provided through a TechValidate survey conducted October 2020.Related ArticleCloud migration: What you need to know (and where to find it)Google Cloud offers a rich set of solutions and documentation to help guide your cloud migration. Here’s where to find what you need.Read Article
Quelle: Google Cloud Platform

Supporting the next generation of Startups

At Google Cloud, we’re committed to helping organizations at every stage of their journey build with cloud technology, infrastructure, and solutions. For startups, the cloud provides a critical foundation for the future, and can help early-stage businesses not only spin up key services quickly, but also prepare for the bursts of growth they will experience along the journey.Supporting innovative startup businesses is a part of Google’s DNA, and I am excited to join Google Cloud to help every startup—from the earliest days of product-market fit to mature companies with multiple funding rounds under their belts—tap into Google Cloud’s unique capabilities. I’ve spent much of my career in the startup ecosystem, including as a founder and early team member at several successful startups, and I’m thrilled to join Google Cloud to help startups take advantage of Google Cloud’s capabilities. We believe that our products and technology offer startups incredibly strong value, ease-of-use, and reliability. And our AI/ML capabilities, analytics, and collaboration tools have become critical tools for helping startups grow and succeed. My role is to help ensure we match the resources and support of Google Cloud to the right startups, at the right time in their journeys. With that in mind, I want to share more about our vision for helping startups and founders build the next generation of technology businesses on Google Cloud. We’re excited to roll out several new priorities for our startups program in 2021, including: Continuing our support for all early-stage startups, with new offerings specific to their stage to ensure they can get up and running quickly with Google Cloud.Enabling our teams to engage more deeply with select high potential startups and their associated investors, to ensure we’re providing a better overall experience, including hands-on help with Google Cloud products, expertise, and support.More closely aligning our offerings to the stage of a startup’s growth, including helping to connect founders and their teams with the resources that will have the biggest impact depending on the stage of their journey.Expanding resources and support to later-stage startups, including support from our sales and partner teams, increased access to Google Cloud credits, free Google Workspace accounts, go-to-market support, training and workshops, and mentorship from Googlers.Continuing to focus on diversity and inclusion internally and across the broader startup community, including our work with the Black Founders Fund, Google for Startups Accelerator: Women Founders, and other initiatives.To date, we’ve supported thousands of startups around the world grow their businesses with Google Cloud, such as:Sesame, a startup focused on simplifying how patients receive healthcare, which used Google Cloud to ramp up its capacity for telehealth during the global COVID-19 pandemic. Sesame was able to dramatically expand its platform, ultimately scaling to help patients in 35 U.S. states see a doctor, virtually.MyCujoo, a business launched in The Netherlands, which provides a scalable platform for live streaming football competitions around the world, at all levels. The team at MyCujoo is using Google Cloud to power its video and community platform.doc.ai, which has developed a digital health platform that leverages cloud AI and ML capabilities to help users develop personal health insights and predictive models and get a precise view of their health.I’m tremendously excited about the opportunity we have to support the next generation of high-growth companies through our program for startups, and look forward to supporting visionary founders and teams around the world.To learn more and to sign up to join us at cloud.google.com/startups.Related ArticleIDC study shows Google Cloud Platform helps SMBs accelerate business growth with 222% ROIA new IDC study found that Google Cloud SMB customers can achieve a 222% return on their investment over three years with an average annu…Read Article
Quelle: Google Cloud Platform

Database Migration Service Connectivity – A technical introspective

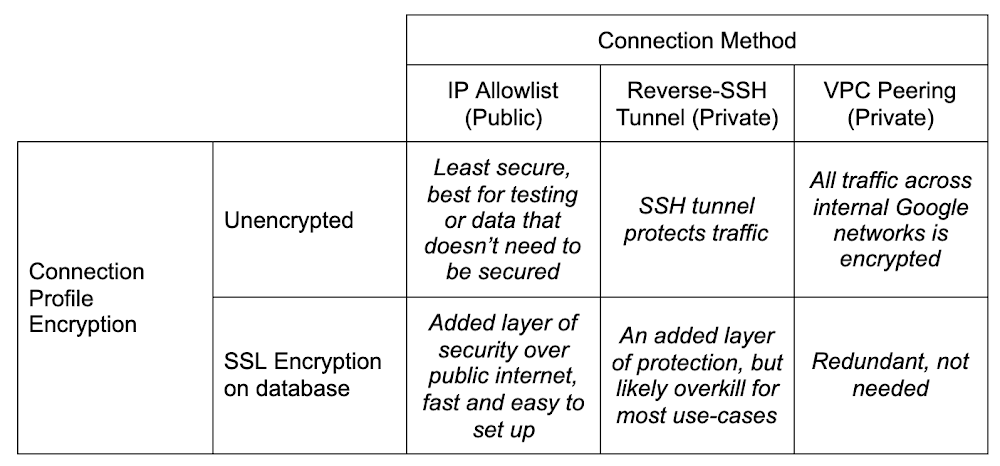
Hopefully you’ve already heard about a new product we’ve released: Database Migration Service (DMS). If you haven’t, you should check out the announcement blog. TL;DR, the idea is to make migrating your databases reliably into a fully managed Cloud SQL instance as easy and secure as possible.I’ll be talking a lot about MySQL (available in preview) and PostgreSQL (available in preview by request, follow this link to sign up) in this post. I’m not leaving SQL Server out in the cold, it’s just that as of the writing of this blog, DMS doesn’t yet support SQL Server, but it will! Look for an announcement for support a bit later on.So, you’ve got a database you want to move into the Cloud. Or perhaps it’s in the Cloud, but it’s not managed by Cloud SQL (yet). Let’s chat a bit, shall we?There’s lots of work that goes into making the decision to migrate, and preparing your application for its data store’s migration. This post assumes you’ve made the decision to migrate, you’re evaluating (or have evaluated and are ready to go with) DMS to do it, and you’re prepared to get your  application all set to cut over and point to the shiny new Cloud SQL instance once the database migration is complete.What I want to talk to you about today is connectivity. I know, I know, it’s always DNS. But, on the off chance it’s not DNS? Let’s talk. DMS guides you through the process with several knobs you can turn to fit how you manage the connection between your source and the managed Cloud SQL database in a way that satisfies your org’s security policy.Before I go too far down the connectivity rabbit hole, I want to call out that there are things that you’ll need to do and think about before you get here. You’ll want to think about preparing your database and application for migration, and understand the next steps once the migration with DMS is complete. Be on the lookout for a few other blogs that cover these topics in depth. One in particular which covers homogenous migration best practices segues nicely into my next section…Pre-emptive troubleshootingCouple pieces that are super important for prep that I want to also call out here, because they will cause a failure if you miss them. They are covered in depth in the blog I linked to just above, and are presented in the DMS UI as required configuration for migration, but they are important enough to repeat!Server_id configIf you’re migrating MySQL (I might have hit this a few times, and by a few I mean lots), don’t forget to change your source database’s server_id. The TL;DR is when you set up replicas, each database has to have a different server_id. You can change it a few different ways. You can start the mysqld process with the –server-id=# flag if you’re starting it by hand, or via script. You can connect to the db with a client and run SET GLOBAL server_id=#, but note if you do this, you have to remember to re-do this each time the server resets. And lastly, you can set in a my.cnf file:Bind-address configOne other big thing to watch out for, which I hit a couple times as well, is the bind-address for your database. Again, this is covered in more detail in the other posts, but to fix it (and note you should be careful here as it can be a security risk) you need to change it in your configuration from the default (at least for MySQL) from 127.0.0.1 to 0.0.0.0. This is what opens it wide to allow connections from everywhere, not just local connections. You can also try to be more targeted and just put the IP address of the created Cloud SQL database, but the exact IP address can be a bit hard to pin down. Cloud SQL doesn’t guarantee outgoing IP addresses, so specifying the current one may not work.For both server_id and bind-address, don’t forget if you’re changing the configuration files you need to restart the database service so the changes take effect.Connectivity options and setupDMS has a matrix of how you can connect your source database to the new Cloud SQL instance created in the migration setup. Choose the method that best fits where your source database lives, your organization’s security policy, and your migration requirements. As you can see, most of the decisions come down to how secure you need to be. Consider, for example, that using the IP allowlist method means poking a hole in your network’s firewall for incoming traffic. This might not be possible depending on your company’s security policies. Let’s dive in.DMS Connection ProfilesWhen defining your source, you create a connection profile that defines the information used to connect to the source database you are migrating from. These connection profiles are standalone resources, so once you’ve created one, you can re-use it in future migrations. A use case for re-use might be something like, as a step towards sharding your database, you might want to migrate the same database to multiple target Cloud SQL instances that would live behind a proxy or load balancer of some sort. Then you could pare down each individual instance to only the sharded data you want in each one, rather than trying to be careful to only pull out the sharded data from the main instance.Connection profiles are made up of the following components: The source database engine, a name and ID, connection information for the database itself (host, port, username, password) and whether or not you want to enforce SSL encryption for the connection. Everything’s straight forward here except the SSL connectivity, which can be confusing if you’re not familiar with SSL configurations. DMS supports either no encryption, server-only encryption, or server-client encryption. The documentation on this is good for explaining this bit!Short version: Server-only tells the Cloud to verify your source database, and server-client tells both to verify each other. Best practice is of course to always encrypt and verify. If you’re really just playing, and don’t want to deal with generating SSL keys, then sure, don’t encrypt. But if this is at all production data, or sensitive data in any way, especially if you’re connecting with public connectivity, please please be sure to encrypt and verify.When you do want to, the hardest part here is generating and using the right keys. DMS uses x509 formatted SSL keys. Information on generating and securing instances with SSL, if you haven’t done it before, can be found here for MySQL and here for PostgreSQL. Either way, you’ll need to be sure to get your keys ready as part of your migration prep. On MySQL for example, you can run mysql_ssl_rsa_setup to get your instance’s keys, and it’ll spit out a bunch:If, like me, you’re relatively new to setting up SSL against a server, you can test to be sure you’ve set it up correctly by using a client to connect via SSL. For example, for MySQL you can do:  mysql -u root -h localhost –ssl-ca=ca.pem –ssl-cert=client-cert.pem –ssl-key=client-key.pem –ssl-mode=REQUIRED -p to force testing if your keys are correct.I had a bit of difficulty uploading the right formatted key using the upload fields. It complained about improperly formatted x509 keys, despite me confirming that I had (or least I THOUGHT I was sure, I am not an SSL expert by any stretch of the imagination) wrapped them correctly. The solution for me, if you’re getting the same errors, was to simply switch from uploading the key files to manually entering them, and copy/pasting the contents of the key into the fields. That worked like a charm!Okay, so now that we’re covered on the source side, time to talk about the different methods we can use to connect between the source and the soon-to-be-created Cloud SQL instance.Creating the destination is straightforward in that you’re specifying a Cloud SQL instance. DMS handles all the pieces setting up the replication and preparing it to be receiving the data. The one thing to look out for is connectivity method. If you use IP allowlist, you need to have Public IP set for connectivity on the Cloud SQL instance, and for Reverse-SSH and VPC peering, you need to have Private IP set. And if you’re using VPC peering, be sure to put the Cloud SQL instance into the same VPC as the GCE instance where your source database lives. Don’t worry, if you forget to select the right setting or change your mind, DMS will update the Cloud SQL instance settings when you choose your connectivity setting.As I outlined above, there are three different ways you can bridge the gap: IP allowlist, Reverse-SSH tunnel, and VPC peering. Really this decision comes down to one consideration: how secure you’re required to be. Maybe because of some industry regulations, internal policies, or just needing to be secure because of the data involved in the database.Note here before we get into specifics… one of the hardest parts about migrating a database (to me), whether that is on your home machine playing around, or it’s on a server on-prem at your office’s server room, or in some other cloud, is creating a network path between all the various firewalls, routers, machines and the Internet. I was stuck here for longer than I care to admit before I realized that I not only had a router I had to forward ports between so it knew how to find my local database, but I ALSO had a firewall on my modem/router that sits between the internet and my internal switch which I had failed to ALSO forward through. So word to the wise, triple check each hop on your network that it’s correctly forwarding from the outside. If you have a network expert handy to help, they can even help create the connection profile for you to use later!IP allowlistIP allowlisting is, by an order of magnitude, the simplest method of connecting the two points. When creating your Cloud SQL instance as part of migration setup, you’re going to add an authorized network pointing at the IP address of your source database and conversely, you need to open a hole in your own firewall to allow Cloud SQL to talk to your source database. In my case, running a local database meant searching whatsmyip, and copying the IP into the authorized network in the Cloud SQL creation. And the other direction was I created a port forward on my firewall for traffic from the Cloud SQL outgoing IP address, which DMS gave me on the connectivity step (but I could have also copied from the Cloud SQL instance’s details page), to my local database’s machine, and away we went. There aren’t any special gotchas with this method that I’ve encountered beyond what I mentioned above about making sure to check your network topology for anything stopping the route from getting through to your database.IP allowlist is the least secure of the three connectivity methods. I’m not saying that it’s inherently insecure. As long as you’re still using SSL encryption, you’ll probably find it’s still plenty secure for your normal use-cases. Just compared to the reverse-SSH tunnel, or using a VPC peering, it’s going to be less secure. It’s all relative!Reverse-SSH tunnel via cloud-hosted VMNext in the secure spectrum is going to be reverse-SSH tunneling. If you haven’t used this before, or don’t know what it is, I really liked this person’s answer on stack exchange. It’s a good, thorough explanation that makes it easy to understand what’s going on. Short version, think of it as a literal tunnel that gets built between your source database network, a virtual machine instance in Google Compute Engine, and the Cloud SQL instance that you’re migrating to. This tunnel shields your traffic from the internet it travels through.Alright, so with this method, we have an added component: The virtual machine that we use as the connector piece of our SSH tunnel. This brings with it an added layer of fun complexity! For the most part, the creation of this is handled for you by DMS. When you choose Reverse-SSH as your connectivity method in the UI, you have the option of using an existing VM, or creating one. Either way, a script will be generated for you that when run from a machine that has access to your source database, will set up the VM in such a way that it can successfully be used as the SSH tunnel target.As with all things automated, there’s a few gotchas here that can happen and cause some rather hard to diagnose blocks. Things I hit to watch out for:VM_ZONE The UI is pretty good about this now, but beware that if somehow you manage to get to viewing the VM setup script before the Cloud SQL instance completes setup first (and creating a Cloud SQL instance can take up to about five minutes sometimes), then a variable in the script will not get set properly: VM_ZONE.It won’t have the right zone there, and you’ll have to fill it in, and/or re-hit the “View Script” button once the Cloud SQL instance creation finishes to have it filled in.Machine typeAs of the writing of this blog, this hasn’t been fixed yet, but the VM_MACHINE_TYPE is also the wrong variable if you left the machine type dropdown as the default. The variable will be set to db-n1-standard-1 in the script, when it should be n1-standard-1. That will fail to create the VM.Server IDTriple check that if you’re migrating MySQL that your server_id is set to non-zero. I know, I said it before. I may or may not have forgotten at this step and lost some time because of it. Just sayin’.The script also immediately establishes the reverse tunnel in the background with this line:gcloud compute ssh “${VM_NAME}” –zone=”${VM_ZONE}” –project=”${PROJECT_ID}” — -f -N -R “${VM_PORT}:${SOURCE_DB_LOCAL_IP}:${SOURCE_DB_LOCAL_PORT}”Heads up, this script will run something in the background on the machine you run it on. That -f in the above command is what causes it to be in the background. I’m not a fan of things running in the background, mostly because then I have to remember to stop it if it’s not something I want running all the time. In this case, if I’m doing multiple migrations it could get confused about which tunnel should be used, or some other edge case. So for me, I stripped this command out of the script, ran it to generate the VM, then ran this command without the -f in a terminal, substituting the values from the script variables.So, run the script (even though I didn’t leave the background command in there, it’s fine if you’re comfortable with it, just don’t forget that you did). Once you do, in the output from the script, you’ll see a line like:  echo “VM instance ‘${VM_NAME} created with private ip ${private_ip}”. That IP address you need to put in the field VM server IP in the DMS migration step 4.So, remember when I said network connectivity can be a challenge? I wasn’t kidding. Now we have another layer of complexity with the virtual machine. By default, Google Compute Engine virtual machines are very locked down by a firewall (Security!!! It’s good that they are even if it makes our life more complicated). In order for reverse-SSH to work, we need to open a pinhole to our VM to communicate with the Cloud SQL instance we’ve created, even across the internal network. To do this, we need to create a new firewall rule.First things first, we want to keep things as locked down as we can. Towards that end, head over to the details page for the virtual machine you just created. The list of VMs are here. Edit your VM, and scroll down to find the network tags section:This allows you to pinpoint JUST this instance with your firewall rules. The tag can be anything, but remember what you use for the next step.Head on over to the firewall area of the console. It’s under Networking -> VPC network -> Firewall. Or just click here. Create a new firewall rule. Give it a name, and if you’re using a different VPC for your migration than the default one, be sure you pick the right one in the Network dropdown menu. Then in the Targets field, leave it on Specified target tags and in the field below, put the same tag that you added to your VM. Now, for the source filter, we have a bit of an oddity.Let me explain. Traffic comes from Cloud SQL through the tunnel back to your source to ensure connectivity. You can look back up at the diagram at the beginning of this section to see what it looks like.This means that Cloud SQL is going to try to get through the firewall to the VM, which is why we need to do this. There’s a catch here. The IP address you see for Cloud SQL, which you might think is what you need to put into the IP range filter for our firewall, is NOT in fact, the IP address that Cloud SQL uses for outgoing traffic. What this causes is a situation where we don’t know the IP address we need to filter on here. Cloud SQL doesn’t guarantee a static address for outgoing Cloud SQL traffic.So to solve for this, we need to allow the whole block of IP addresses that Cloud SQL uses. Do this by putting 10.121.1.0/24 in the Source IP ranges field. This is unfortunately a necessary evil. To lock it down further though, if you’re feeling nervous about doing this (they’re internal IPs so it’s really not that bad), you can, in the Protocols and ports section of your firewall, only allow tcp for the default port for your db engine (3306 for MySQL or 5432 for PostgreSQL). So the firewall will only allow traffic from that internal range of IPs, and only on the port of your db engine, and only for that one VM that we created.That’s it for the firewall, go ahead and hit Create. We should now, in theory, be all set to go! If you didn’t run the actual command to setup the tunnel in the script, then run it now; this is the command were talking about: gcloud compute ssh “${VM_NAME}” –zone=”${VM_ZONE}” –project=”${PROJECT_ID}” — -N -R “${VM_PORT}:${SOURCE_DB_LOCAL_IP}:${SOURCE_DB_LOCAL_PORT}”Once that’s going, you’re good to hit Configure & Continue and on to testing the job! Presuming all the stars align and the network gods favor you, hitting “Test Job” should result in a successful test, and you’re good to migrate!VPC PeeringPHEW, okay. Two methods down, one to go.VPC peering is, similarly to IP allowlist, very straightforward as long as you don’t forget the fundamentals I mentioned up above. Server_id, being sure your source database has its bind-address set to allow connections from the target, etc.There’s two scenarios (probably more, but two main ones) where you’d want to use VPC peering:Your source database is running in Google Cloud already, like on a Compute Engine instance.You’ve set up some networking to peer your source database’s network to the Google Cloud network using something like Cloud VPN or Cloud Interconnect.There is yet another deep rabbit hole to be had with peering external networks into GCP. In some cases it involves routing hardware in regions, considerations around cost versus throughput, etc. It’s a bit beyond the scope of this blog post because of the combinations possible, which often bring with them very specific requirements, and this blog post would end up being a novella. So for now, I’m going to gloss over it and just say it’s definitely possible to join your external network to Google Cloud’s internal one and use VPC peering to do a migration that way. In our documentation there’s a page that talks about it with an example if you want to dig in a bit more here.A more traditional usage of the VPC peering, however, is when you’ve got a database running on Compute Engine and want to switch to the more managed solution of Cloud SQL. There are several reasons why you might have originally wanted to be running your database on Compute Engine. A particular flag you were relying on that wasn’t mutable on Cloud SQL, or a version of MySQL or PostgreSQL you needed that wasn’t available yet, and many more.Whatever the reason you have it on GCE, now you’d like it managed on Cloud SQL, and VPC peering is the way to go. Here you’ll need to double-check the config settings on your database to be sure it’s ready as I’ve mentioned before. When creating your source connection profile, the IP address will be the GCE VM’s internal IP, not external IP (keep things inside the private network). You’ll need the firewall setup same as I described with the reverse-SSH tunnel. Note, that when you’re using VPC, the IP address of the Cloud SQL instance that you need to allow into your GCE instance won’t be the standard Cloud SQL range (10.121.1.0/24) because it will have been allocated an IP range in the VPC instead. So you’ll want to head over to the Cloud SQL instances page and grab the internal IP address of the read replica that’s there. If you don’t see the instance you created in the DMS destination step, or if the internal IP address isn’t specified, it might just not have been created yet. It does take a few minutes. Last piece is just make sure that whatever VPC you want this to happen in, all the pieces need to be in the same network. Your Cloud SQL destination you created, and the GCE instance holding your source database. Which means you might need to move them both into a new VPC first if that’s what you want. There’s definitely nothing wrong with doing it in the default VPC, BUT note if this is a very old project, then you may have a legacy default VPC. If you do, this won’t work and you will need to create a new VPC to do the migration.1) Logging. There’s two places which can help here. In the details of your GCE instance that’s hosting your database, or the hosting machine for the reverse-SSH tunnel, there’s a link for Cloud Logging.Clicking on that takes you straight to Logging filtered on that GCE’s entries. Then the second place is on the VPC network’s subnet you’re using. You can go here and then click on the zone that your GCE instance lives on, edit it, and turn on Flow Logs. Once you’ve done that, you can re-try the migration test and then check the logs to see if anything looks suspicious.2) Connectivity Tests. I hadn’t known about this until I was working with DMS, and it’s very handy. It lets you specify two different IP addresses (source and destination), a port you want to look at (MySQL 3306, PostgreSQL 5432), and it will give you a topology that shows you what hops it took to get from point a to point b, which firewall rules were applied to allow or deny the traffic. It’s super fun. You can go straight to it in the console here to play with it. It does require the Network Management API to be enabled to work with it.ConclusionThat’s it! Hopefully I’ve covered the basics here for you on how to get your source database connected to DMS in order to get your database migrated over to Cloud SQL. There’s some pieces to handle once you’ve finished the migration and we have an upcoming blog post to cover those loose ends as well.If you have any questions, suggestions or complaints, please reach out to me on Twitter, my DMs are open! Thanks for reading.Related ArticleAccelerating cloud migrations with the new Database Migration ServiceThe new Database Migration Service lets you perform a homogeneous migration to managed cloud databases like Cloud SQL for MySQL.Read Article
Quelle: Google Cloud Platform

Rate Limiting Questions? We have answers

As we have been implementing rate limiting on Docker Hub for free anonymous and authenticated image pulls, we’ve heard a lot of questions from our users about how this will affect them. And we’ve also heard a number of statements that are inaccurate or misleading about the potential impacts of the change. I want to provide some answers here to help Docker users clearly understand the changes, quantify what is involved, and help developers choose the right Docker subscription for their needs.

First let’s look at the realities of what rate limiting looks like, and quantify what is still available for free to authenticated Docker users. Anyone can use a meaningful number of Docker Hub images for free. Anonymous, unauthenticated Docker users get 100 container pull requests per six hours. And when a user signs up for a free Docker ID, they get 2X the quantity of pulls. At 200 pulls per six hours, that is approximately 24,000 container image pulls per month per free Docker ID. This egress level is adequate for the bulk of the most common Docker Hub usage by developers. (Docker users can check their usage levels at any time through the command line. Docker developer advocate Peter McKee shows how to get your usage stats in this blog.)

Here is the schedule for final implementation of the rate limits for unauthenticated and free Docker Hub users: these do NOT apply to Docker Pro and Team Subscribers:

DateSpike Hours (PST)Anonymous LImit (per 6 hours)Free Limit w/ Docker ID (per 6 hours)11/12/2020No Spike50050011/16/20203am–3pm (12 hrs)25025011/18/2020No Spike (final)100200

Images hosted on Docker Hub range in size from megabytes to gigabytes, so many common container images will quickly consume multiple GB of repository data in a CI/CD pipeline. With Docker Hub, you don’t have to worry about the size of images being pulled, but rather you can focus on the frequency and contents of your builds instead. And not all repositories are created equal: Docker Hub features Docker Official and Docker Certified images of hundreds of popular packages, so you can be confident in official images as being vetted by Docker before incorporating into your CI/CD pipeline. 

Mirror, Mirror

Another common question we get is about using an internal mirror to pull images for an organization. This is absolutely a supported deployment model and a best practice that allows your developers to access the images they use the most from within your firewall. In this case all you would need to do is create a Docker Team account and assign one of the users as a service account to pull the images needed. Mirroring can be done with a range of technologies including Docker Registry. Our engineering team is reaching out to users who are making an unusually high number of requests to Docker Hub. In many cases, the excessive use is a result of misconfigured code that hasn’t been caught previously. For many of these users, once their code is remediated, the quantity of requests decreases dramatically. 

Designed for Developers

Along with a different approach to measuring pulls vs image sizes, we also believe our pricing model is right for developers. Docker subscription pricing is straightforward and predictable. Starting at $5 per month, per user, developers and dev teams can sign up, budget, and grow at a rate that is predictable and transparent. Many of the “free” offerings out there instead bill against cloud resources consumed by images being stored or consumed. Budgeting for developer seats against variable resources can be a challenge with this model: we believe our model is both easier to understand and budget, and delivers meaningful value to subscribers. 

We also recognize the needs of Open Source Software projects, who need advanced capabilities and greater throughput while operating as non-profit entities. We are committed to open source and providing sustainable solutions for open source projects. For qualifying projects, we announced our Open Source Software program so these projects can use Docker resources without charge. To date, over 40 projects of all sizes have been approved as part of this program. OSS teams can submit their projects for consideration through this form.

Finally, Docker Subscriptions are about more than just additional access to container pulls. Last week we announced a number of new features for Docker Pro and Team subscribers, including enhanced support and access to vulnerability scan results in Docker Desktop. Docker subscribers will continue to see new capabilities and functionality added every month. For a good overview of the features available to Docker Pro and Team subscribers, visit the Docker Pricing Page. 

I want to thank the Docker community for their support during this transition. Reducing excessive use of resources allows us to build a sustainable Docker for the long term. Not only does this help us invest more money into being responsible stewards of the Docker project, but it also improves performance and stability of Docker resources for all of our users.

Additional resources:

Docker Pricing OverviewDocker Hub Rate Limiting Information Page
The post Rate Limiting Questions? We have answers appeared first on Docker Blog.
Quelle: https://blog.docker.com/feed/