AMD Ryzen: Threadripper Pro unterstützen 2 TByte RAM
Die Threadripper-Pro-CPUs mit bis zu 64 Kernen und acht Speicherkanälen stecken in Lenovos Thinkstation P620. (AMD Zen, Prozessor)
Quelle: Golem

Die Threadripper-Pro-CPUs mit bis zu 64 Kernen und acht Speicherkanälen stecken in Lenovos Thinkstation P620. (AMD Zen, Prozessor)
Quelle: Golem
Running containers in the cloud can be hard and confusing. There are so many options to choose from and then understanding how all the different clouds work from virtual networks to security. Not to mention orchestrators. It’s a learning curve to say the least.
At Docker we are making the Developer Experience (DX) more simple. As an extension of that we want to provide the same beloved Docker experience that developers use daily and integrate it with the cloud. Microsoft’s Azure ACI provided an awesome platform to do just that.
In this tutorial, we take a look at running single containers and multiple containers with Compose in Azure ACI. We’ll walk you through setting up your docker context and even simplifying logging into Azure. At the end of this tutorial, you will be able to use familiar Docker commands to deploy your applications into your own Azure ACI account.
Prerequisites
To complete this tutorial, you will need:
Docker installed on your development machine. You can download and install Docker Desktop Edge version 2.3.3.0 or later from the links below:Docker Desktop for MacDocker Desktop for WindowsDocker Hub account. Get your free account here.An Azure account. Sign up for free.Git installed on your development machine.An IDE or text editor to use for editing files. I would recommend VSCode
Run Docker Container on ACI
The integration with Azure ACI is very similar to working with local containers. The development teams have thought very deeply about the developer experience and have tried to make the UX for working with ACI as close as possible to working with local containers.
Let’s run a simple Nginx web server on Azure ACI.
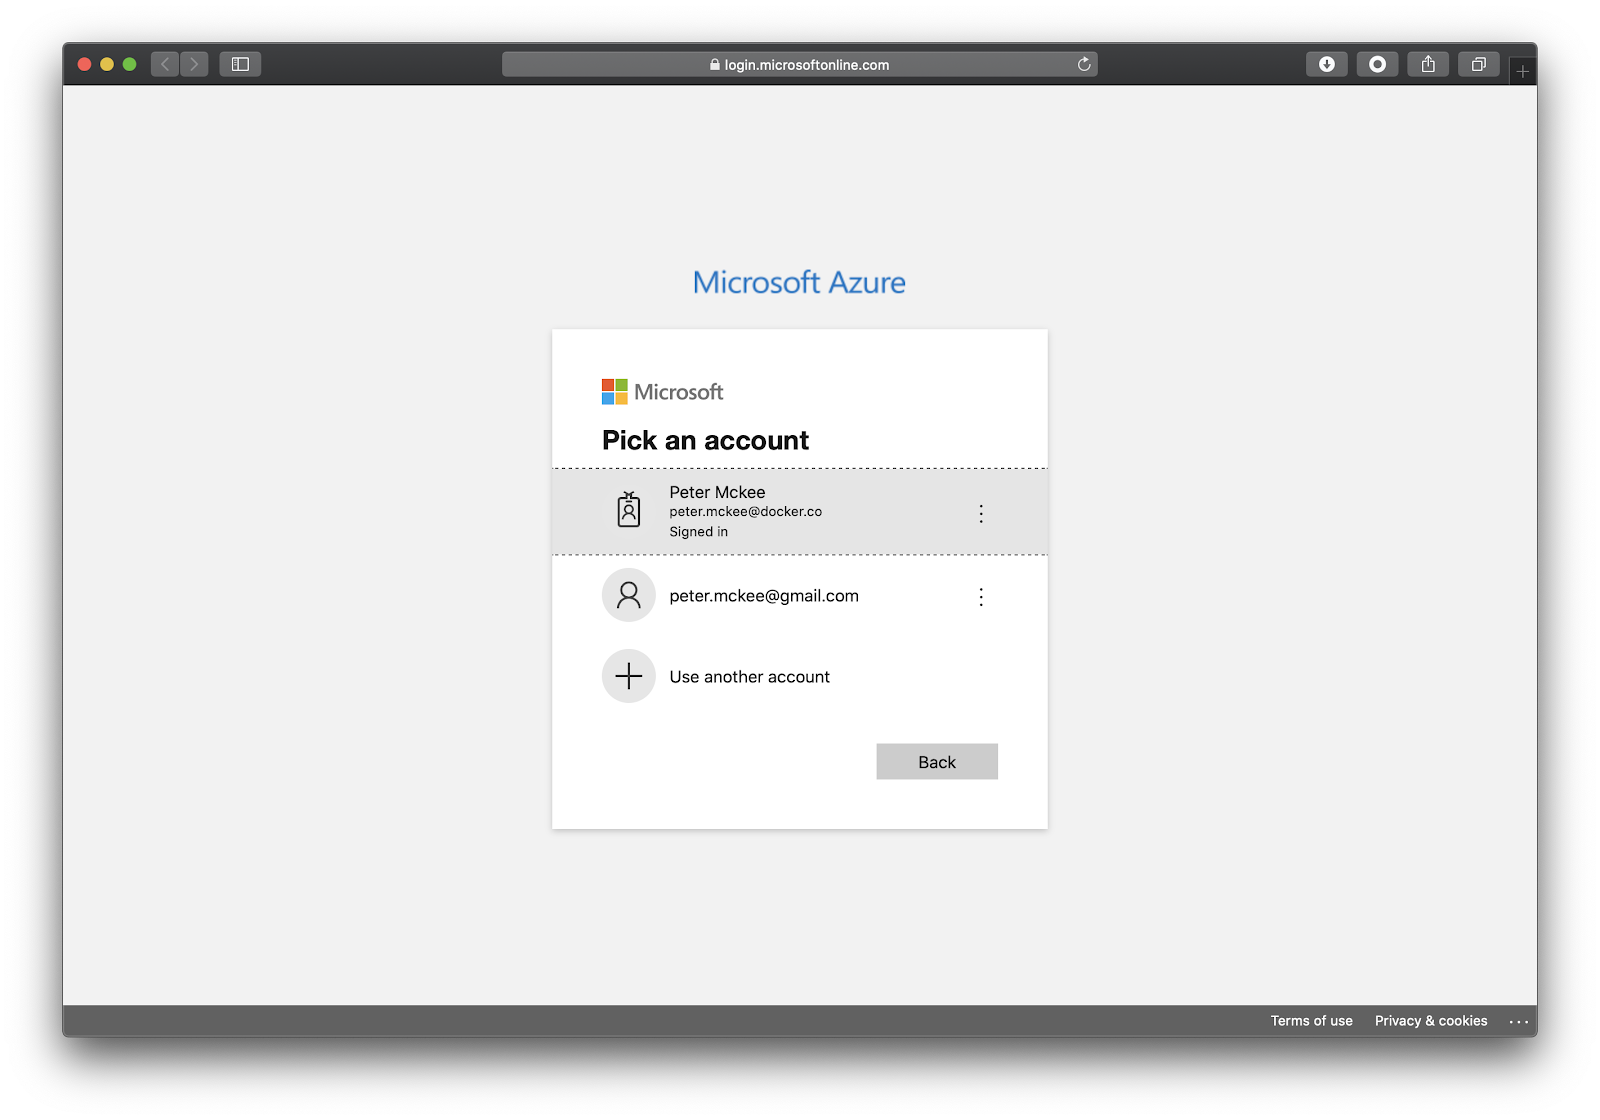
Log into Azure
You do not need to have the Azure CLI installed on your machine to run Docker images in ACI. Docker takes care of everything.
The first thing you need to do is to login to Azure.
$ docker login azure
This will open a browser window which will allow you to login to Azure.
Select your account and login. Once you are logged in, you can close the browser window.
Azure ACI Context
Docker has the concept of a context. You can think of a context as a place where you can run docker containers.It’s a little more complicated than this but this is a good enough description for now. In this tutorial, we use our local context and the new ACI context.
Let’s first take a look at what contexts we currently have on our local development machine. Run the following command to see a list of contexts.
$ docker context list
NAME TYPE DESCRIPTION DOCKER ENDPOINT KUBERNETES ENDPOINT ORCHESTRATOR
default * moby Current DOCKER_HOST based configuration unix:///var/run/docker.sock https://kubernetes.docker.internal:6443 (default) swarm
Depending on if you have already created another context, you should only see one context. This is the default context that points to your local Docker engine labeled as “moby”. You can identify the current context that will be used for docker commands by the “*” beside the name of the active context.
Now let’s create an ACI context that we can run containers with. We’ll use the create aci command to create our context.
Let’s take a look at the help for creating an aci context.
$ docker context create aci –help
Create a context for Azure Container Instances
Usage:
docker context create aci CONTEXT [flags]
Flags:
–description string Description of the context
-h, –help help for aci
–location string Location (default “eastus”)
–resource-group string Resource group
–subscription-id string Location
Global Flags:
–config DIRECTORY Location of the client config files DIRECTORY (default “/Users/peter/.docker”)
-c, –context string context
-D, –debug enable debug output in the logs
-H, –host string Daemon socket(s) to connect to
Underneath the Flags section of the help, you can see that we have the option to set the location, resource-group, and subscription-id.
You can pass these flags into the create command. If you do not, the docker cli will ask you these questions in interactive mode. Let’s do that now.
$ docker context create aci myaci
The first thing the cli will ask is what subscription you would like to use. If you only have one then docker will use that one.
Using only available subscription : Azure subscription 1 (b3c07e4a-774e-4d8a-b071-xxxxxxxxxxxx)
Now we need to select the resource group we want to use. You can either choose one that has been previously created or choose “create a new resource group”. I’ll choose to create a new one.
Resource group “c3eea3e7-69d3-4b54-83cb-xxxxxxxxxxxx” (eastus) created
Okay, our aci context is set up. Let’s list our contexts.
$ docker context list
You should see the ACI context you just created.
Run Containers on ACI
Now that we have our ACI context set up, we can now run containers in the cloud. There are two ways to tell Docker which context you want your commands to be applied to.
The first is to pass the –context flag. The other is to tell Docker which context we want to use with all subsequent commands by switching contexts. For now, let’s use the –context flag.
$ docker –context myaci run -d –name web -p 80:80 nginx[+] Running 2/2 ⠿ web Created ⠿ single–container–aci Done web
Here you can see that Docker interacted with ACI and created a container instance named “web” and started a single instance.
Open your Azure portal and navigate to container instances.
We can also run Docker CLI commands that you are already familiar with such as ps and logs.
Switch Contexts
Let’s take a look at our running containers. But before we do that let’s switch our active context to the ACI context we setup above so we do not have to keep typing –context with every command.
$ docker context use myaci
Now let’s run the ps command without passing the –context flag.
$ docker psCONTAINER ID IMAGE COMMAND STATUS PORTSweb nginx Running 52.224.73.190:80->80/tcp
Nice, since we told Docker to use the myaci context, we see a list of containers running in our Azure account and not on our local machine.
Let’s make sure our container is running. Copy the IP address of the container from the above ps output and paste it into your browser address bar. You can see our Nginx web server running!
Like I mentioned above, we can also take a look at the container’s logs.
$ docker logs web
To stop and remove the container, run the following command.
$ docker rm web
BOOM!
That was pretty easy and the integration is smooth. With a few docker commands that you are already familiar with and a couple new ones, we were able to run a container in ACI from our development machine pretty quickly and simply.
But we’re not done!
Docker Compose
We can also run multiple containers using Docker Compose. With the ACI integration, we now have the ability to run compose commands from the docker cli against ACI. Let’s do that next.
Fork the Code Repository
I’m using a simple Python Flask application that logs timestamps to a Redis database. Let’s fork the repository and then clone the git repository to your local machine.
Open your favorite browser and navigate to: https://github.com/pmckeetx/timestamper
Click on the “fork” button in the top right corner of the window. This will make a “copy” of the demo repository into your GitHub account.
On your forked version of the repository, click the green “Code” button and copy the github url.
Open up a terminal on your local machine and run the following git command to clone the repository to your local development machine.
Make sure you replace the <<github username>> with your GitHub username.
git clone git@github.com:<<github username>>/timestamper.git
Build and Run Locally
Make sure you are in the root directory for the timestamper project and follow the following steps to build the images and start the application with Docker Compose.
First we need to add your Docker ID to the image in our docker-compose.yml file. Open the docker-compose.yml file in an editor and replace <<username>> with your Docker ID.
Next, we need to make sure we are using the local Docker context.
$ docker context use default
Now we can build and start our application using docker-compose.
$ docker-compose up –buildBuilding frontendStep 1/7 : FROM python:3.7-alpine —> 6ca3e0b1ab69Step 2/7 : WORKDIR /app…frontend_1 | * Running on http://0.0.0.0:5000/ (Press CTRL+C to quit)frontend_1 | * Restarting with statfrontend_1 | * Debugger is active!frontend_1 | * Debugger PIN: 622-764-646
Docker will build our timestamper image and then run the Redis database and our timestamper containers.
Navigate to http://localhost:5000 and click the Timestamp! button a couple of times.
Compose on ACI
Now let’s run our application on ACI using the new docker compose integration.
We’ll first need to push our image to Docker Hub so ACI can pull the image and run it. Run the following command to push your image to your Docker Hub account.
$ docker-compose pushPushing frontend (pmckee/timestamper:latest)…The push refers to repository [docker.io/pmckee/timestamper]6e899582609b: Pushed…50644c29ef5a: Layer already existslatest: digest: sha256:3ce2607f101a381b36beeb0ca1597cce9925d17a0f826cac0f7e0365386a3042 size: 2201
Now that our image is on Hub, we can use compose to run the application on ACI.
First let’s switch to our ACI context.
$ docker context use myaci
Remember, to see a list of contexts and which is being used, you can run the list contexts command.
$ docker context list
Okay, now that we are using the ACI context, let’s start our application in the cloud.
$ docker compose up[+] Running 3/3 ⠿ timestamper Created⠿ frontend Done⠿ backend Done
Let’s verify that our application is up and running. To get the IP address of our frontend, let’s list our running containers.
$ docker psCONTAINER ID IMAGE COMMAND STATUS PORTStimestamper_frontend pmckee/timestamper Running 40.71.234.128:5000->5000/tcptimestamper_backend redis:alpine Running
Copy the IP address and port listed above and paste into your favorite browser.
Let’s take a look at the logs for our Redis container.
$ docker logs timestamper_backend
1:C 13 Jul 2020 18:21:12.044 # oO0OoO0OoO0Oo Redis is starting oO0OoO0OoO0Oo…1:M 13 Jul 2020 18:21:12.046 # Server initialized1:M 13 Jul 2020 18:21:12.047 * Ready to accept connections
Yes, sir! That is a Redis container running in ACI! Pretty cool.
After you play around a bit, you can take down the compose application by running compose down.
$ docker compose down
Conclusion
We saw how simple it is now to run a single container or run multiple containers using Compose on Azure with our ACI integration. If you want to help influence or suggest features, you can do that on our public Roadmap.
If you want to learn more about Compose and all the cool things that are happening around the OpenSource initiative, please checkout Awesome Compose and the OpenSource Compose specification.
The post How To Deploy Containers to Azure ACI using Docker CLI and Compose appeared first on Docker Blog.
Quelle: https://blog.docker.com/feed/

Die neue Star-Wars-Serie The Bad Batch ist ein Ableger der Animationsserie The Clone Wars und wird exklusiv für Disney+ produziert. (Star Wars, Disney)
Quelle: Golem

Wir haben uns angesehen, was der Versatile Video Codec leistet – und sind überzeugt. Der Verbreitung des Codecs wird das aber nur bedingt helfen. Ein Bericht von Sebastian Grüner (VVC, H.264)
Quelle: Golem

Die Pläne zum Rust-Support im Linux-Kernel werden konkreter. Linux-Gründer Torvalds sagt, wie das aus seiner Sicht klappen könnte. (Linux-Kernel, Linux)
Quelle: Golem

Der Refresh von Skylake-X war ein Takt-Update mit verlötetem Heatspreader. (Skylake, Prozessor)
Quelle: Golem

Panasonic und Technics bringen Bluetooth-Hörstöpsel mit aktiver Geräuschunterdrückung (ANC) auf den Markt. Zum Teil sind sie technisch identisch. (Bluetooth-Hörstöpsel, Bluetooth)
Quelle: Golem

The Azure Maps visual for Power BI will be releasing as a preview this week. Power BI is a powerful analysis and visualization tool. Azure Maps is an important tool for gaining geospatial context and insights that can be used in decision making.
This initial release includes the following visualization layers:
Bubble layer
3D bar chart layer
Reference layer
Custom tile layer
Real-time traffic overlay
In addition to these visualization layers, this visual also leverages built-in Power BI features, such as tooltips, color themes, as wells as filter and slicer support.
Bubble layer—represent location data as scaled circles
Bubble layers are a great way to represent location data as scaled circles on the map. Customers can use a linear scaling method or customize the scaling logic using a logarithmic or Cubic-Bezier curve. Additionally, users can pass a value into the legend field and have the fill color of the circles dynamically set; and, outline the circles with a single color or enable the high contrast outline option to have a high contrast variant of the fill color assigned to the circle to help ensure the circles are clearly visible regardless of which style the map is set to. Allowing the user to easily visualize two metrics for each location on the map, scale, and category.
For example, the following image shows bicycle accident locations in North Carolina. The color indicates the speed limit of the road the accident occurred on and the size is based on the number of individuals involved in the accident.
3D bar chart layer—visualize location data as 3D bars or cylinders
3D bar charts are useful for taking data to the next dimension by allowing visualization of location data as 3D bars or cylinders on the map. Users can tilt and rotate the map by holding down the right mouse button and dragging or use one of the navigation controls to view your data from different perspectives.
Similar to the bubble layer, the bar chart later can easily visualize two metrics at the same time using color and relative height. The following map displays store locations with bar heights representing the revenue generated from each location, colored by sales region.
Reference layer—overlay additional data layers to add more context
Power BI currently allows a single data set to be connected to a visual. However, when working with maps, its often desirable to be able to overlay additional data layers to add more context to a report. With this feature, a GeoJSON file containing custom location data can be uploaded and overlaid on the map. Properties in the GeoJSON file can be used to customize the style of the shapes.
For example, the following map image adds a GeoJSON file of census tract boundaries colored by population below a layer of addresses colored by real estate value. This provides insights on how population density is related to property values.
Custom tile layer—superimpose images on top of Azure Maps base map tiles
Overlay a custom tile layer on the map to add an additional layer of context. Tile layers allow you to superimpose images on top of Azure Maps base map tiles. Overlay weather data from the Azure Maps weather services or bring your own tile service.
The following map displays a bubble layer of sales data of store selling sunglasses above a tile layer showing current weather radar from Azure Maps. In this case, we can easily see that less sales of sunglasses are occurring where it is rain.
Real-time traffic overlay—see how traffic congestion relates to your data
Users can overlay real-time traffic flow data to see how traffic congestion relates to their data. For example, the following map is showing the position of field technicians rendered as a bubble layer on the map colored by their experience level and scaled by the amount of remaining time on their current job. Real-time traffic is overlaid on the map and provides a quick visual reference of which technicians are most likely be delayed getting to their next job due to traffic congestion.
Get started with the Azure Maps visual for Power BI
To get started using the Azure Maps visual, first enable it in the Power BI desktop app. To do this, open the options panel though File > Options and settings. Go to the Preview features options and select the Azure Maps visual. Once this is done you will also be able to use this visual in the Power BI website.
This is just the beginning! We have lots of exciting new features planned. Have a feature request? Let us know or vote for an existing request on our feedback site.
Learn more about the Azure Maps Power BI visual.
Quelle: Azure

A year ago we announced the general availability of advanced threat protection for Azure Storage, to help our customers better protect their data in blob containers from the growing risk of cyberattacks. Since then, advanced threat protection for Azure Storage has been protecting millions of storage accounts and helping customers to detect common threats such as malware, access from suspicious sources (including TOR exit nodes), data exfiltration activities, and more.
Today we’re excited to announce the preview of extending advanced threat protection for Azure Storage to support Azure Files and Azure Data Lake Storage Gen2 API, helping our customers to protect their data stored in file shares and data stores designed for enterprise big data analytics.
Growing demand to secure file shares and data lakes
More and more organizations are moving their data to the cloud, seeking better security and data protection, data modernization, and optimized cost and performance of IT operations. It’s expected that over 80 percent of enterprise workloads will be in the cloud by the end of 2020.
This growing demand has also increased the popularity of Azure Files Storage, which delivers secure, Server Message Block (SMB) based, fully managed cloud file shares that can also be cached on-premises for performance and compatibility.
With Azure Files, organizations get the added benefit of a secure storage infrastructure that is massively scalable, and globally available. Even with all these capabilities, it’s still essential to bolster cybersecurity, especially with the growing complexity and sophistication of cyberattacks.
In addition, we’re seeing the growing demand for data stores optimized for big data analytics, and the need to serve and manage massive amounts of data. Azure Data Lake Storage Gen2 is a set of capabilities dedicated to big data analytics, built on Azure Blob storage while focusing on performance, management and security, it supports serving multiple petabytes of information while sustaining hundreds of gigabits.
What’s included in advanced threat protection for Azure Files and ADLS Gen2 API
Advanced threat protection for Azure Storage provides an additional layer of security intelligence that provides alerts when it detects unusual and potentially harmful attempts to access or exploit your storage accounts. This layer of protection allows you to address threats without being a security expert or managing security monitoring systems.
Security alerts are triggered when anomalies in activity occur. These security alerts are integrated with Azure Security Center and are also sent via email to subscription administrators, with details of suspicious activity and recommendations on how to investigate and remediate threats.
Besides the built-in security of Azure file shares and data lakes, customers of advanced threat protection for Azure Storage also benefit from:
World-class algorithms that learn, profile, and detect unusual or suspicious activity in your file shares.
Actionable alerts in a centralized view in Azure Security Center with optional email notifications.
Integration with Azure Sentinel for efficient threat investigation.
Azure-native support for Azure Files with one click enablement from the Azure portal and with no need to modify your application code.
Get started today
We encourage you to try out advanced threat protection for Azure Storage and start detecting potential threats on your Azure Files shares and Azure Blob containers. Advanced threat protection for Azure Storage needs to be enabled on the storage accounts containing the files shares and blob containers you want to protect.
We recommend enabling advanced threat protection for Azure storage on the subscription level by following the instructions here: Configure advanced threat protection for Azure Storage.
Learn more about the pricing of advanced threat protection for Storage price in Azure Security Center pricing page.
For more information on Azure Security Center, please visit Azure Security Center web page.
Quelle: Azure

Mit dem dann schnellsten zivilen Flugzeug will Boom Supersonic wichtige Tests für sein Überschallverkehrsflugzeug durchführen. (Luftfahrt, Technologie)
Quelle: Golem