Creating a secure email ecosystem and blocking COVID-19 cyberthreats in India, Brazil, and the UK

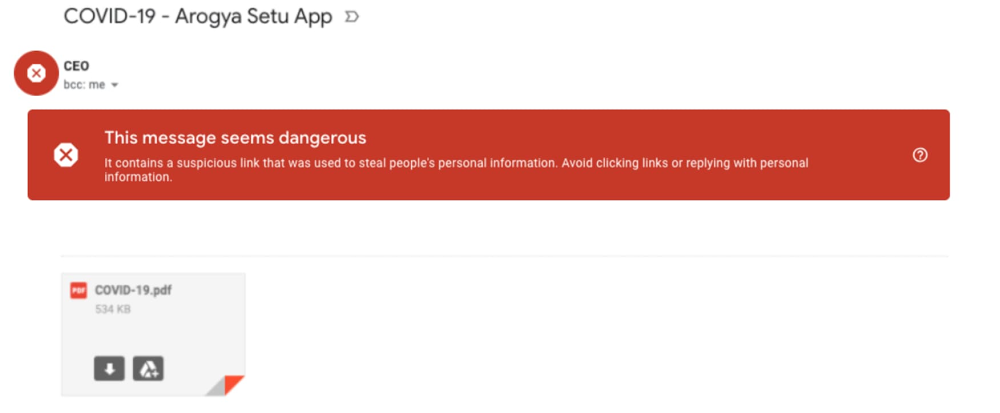
As the world continues to adapt to the changes brought on by the COVID-19 pandemic, cyberthreats are evolving as well. From mimicking stimulus payments, to providing purchase opportunities for items in short supply, bad actors are tailoring attacks to mimic authoritative agencies or exploit fear of the pandemic.Last month, we posted about the large amount of COVID-19 related attacks we were seeing across the globe. At that time, Gmail was seeing 18 million daily malware and phishing emails, and more than 240 million spam emails, specifically using COVID-19 as a lure. To keep you updated on where the threat landscape stands, today we’d like to share some additional email threat examples and trends, highlight some ways we’re trying to keep users safe, and provide some actionable tips on how organizations and users can join the fight.The attacks we’re seeing (and blocking) in India, Brazil, and the UKAs COVID-19 attacks continue to evolve, over the past month we’ve seen the emergence of regional hotspots and threats.Specifically, we’ve been seeing COVID-19-related malware, phishing, and spam emails rising in India, Brazil, and the UK. These attacks and scams use regionally relevant lures, financial incentives, and fear to create urgency and entice users to respond. Let’s look at some examples from these countries.IndiaIn India, we’ve seen an increase in the number of scams targeting Aarogya Setu, an initiative by the Indian Government to connect the people of the country with essential health services.Also, as India is opening back up and employees are getting back to their workplaces, we’re starting to see more attacks masquerading as COVID-19 symptom tracking.And with more and more people looking to buy health insurance in India, phishing scams targeting insurance companies have become more prevalent. Often these scams rely on quoting established institutions, and getting viewers to click on malicious links.The United KingdomWith the UK government announcing measures to help businesses get through the COVID-19 crisis, attackers are imitating government institutions to try to gain access to personal information.These attackers often try to masquerade as Google, as well. But whether they’re imitating the government or Google, these attacks are automatically blocked.BrazilWith the increased popularity of streaming services, we’re seeing increased phishing attacks targeting these services.Here’s another example that relies on fear, suggesting that the reader will be subject to fines if they don’t respond.How we’re blocking novel threats Overall, Gmail continues to block more than 99.9% of spam, phishing, and malware from reaching our users. We’ve put proactive monitoring in place for COVID-19-related malware and phishing across our systems and workflows. In many cases, however, these threats are not new—rather, they’re existing malware campaigns that have simply been updated to exploit the heightened attention on COVID-19. While we’ve put additional protections in place, our AI-based protections are also built to naturally adapt to an evolving threat landscape, picking up new trends and novel attacks automatically. For example, the deep-learning-based malware scanner we announced earlier this year continues to scan more than 300 billion documents every week, and boosts detection of malicious scripts by more than 10%. These protections, newly developed and already existing, have allowed us to react quickly and effectively to COVID-19-related threats, and will allow us to adapt quickly to new ones. Additionally, as we uncover threats, we assimilate them into our Safe Browsing infrastructure so that anyone using the Safe Browsing APIs can automatically stop them. Safe Browsing threat intelligence is used across Google Search, Chrome, Gmail, Android, as well as by other organizations across the globe.G Suite protectionsOur advanced phishing and malware controls come standard with every version of G Suite, and are automatically turned on by default. This is a key step as we move forward to a safe-by-default methodology for Google Cloud products. Our anti-abuse models look at security signals from attachments, links, external images, and more to block new and evolving threats. Keeping email safe for everyoneWhile many of the defenses in Gmail leverage our technology and scale, we recognize that email as a whole is a large and complex network. This is why we’re working not just to keep Gmail safe, but to help keep the entire ecosystem secure. We’re doing this in many ways, from developing and contributing to standards like DMARC (Domain-based Message Authentication, Reporting, and Conformance) and MTA-STS (Mail Transfer Agent Strict Transport Security), to making our technology available to others, as we have with Safe Browsing and TensorFlow Extended (TFX). We’re also contributing to working groups where we collaborate and share best practices with others in the industry. For example, Google is a long-time supporter and contributor to the Messaging, Malware, and Mobile Anti-Abuse Working Group (M3AAWG), an industry consortium focused on combating malware, spam, phishing, and other forms of online exploitation. The M3AAWG community often comes together to support important initiatives, and today we’re co-signing a statement on the importance of authentication. You can help keep email safe for everyone by bringing authentication to your organization.Bringing authentication to your organizationSpeaking of authentication, as we mentioned above, Gmail recommends senders adopt DMARC to help prevent spam and abuse. DMARC uses Sender Policy Framework (SPF) and DomainKeys Identified Mail (DKIM) to help ensure that platforms receiving your email have a way to know that it originally came from your systems. Adopting DMARC has many benefits, including:It can provide a daily report from all participating email providers showing how many messages were authenticated, how often invalidated messages were seen, and what kind of policy actions were taken on those messages It helps create trust with your user base—when a message is sent by your organization, the user receiving it can be sure it’s from youIt helps email providers such as Gmail handle spam and abuse more effectivelyBy using DMARC, we all contribute to creating a safe email ecosystem between providers, organizations, and users. In our previous post, we shared that we worked with the WHO to clarify the importance of an accelerated implementation of DMARC. The WHO has now completed the transition of the entire who.int domain to DMARC and has been able to stop the vast majority of impersonated emails within days after switching to enforcement. You can find more information on setting up DMARC here. Our safety recommendations for users As a user, there are also steps you can take to become even more secure:Take the Security Checkup. We built this step-by-step tool to give you personalized and actionable security recommendations and help you strengthen the security of your Google account.Avoid downloading files that you don’t recognize; instead, use Gmail’s built-in document preview.Check the integrity of URLs before providing login credentials or clicking a link—fake URLs generally imitate real ones and include additional words or domains. Report phishing emails. Turn on 2-step verification to help prevent account takeovers, even in cases where someone obtains your password. Consider enrolling in Google’s Advanced Protection Program (APP)—we’ve yet to see anyone in the program be successfully phished, even if they’re repeatedly targeted. Be thoughtful about sharing personal information such as passwords, bank account or credit card numbers, and even your birthday.  Safety and security are a priority for us at Google Cloud, and we’re working to ensure all our users have a safe-by-default experience, no matter what new threats come our way.
Quelle: Google Cloud Platform

Google Cloud firewalls adds new policy and insights

Firewalls are an integral part of almost any IT security plan. With our native, fully distributed firewall technology, Google Cloud aims to provide the highest performance and scalability for all your enterprise workloads. We also know that the more control and flexibility you have, the more secure you can be. With that in mind, today we’re adding some new firewall features that provide even more flexibility, control, visibility, and optimization. Hierarchical firewall policiesNow in beta, Google Cloud’s hierarchical firewall policies provide new, flexible levels of control so that you can benefit from centralized control at the organization and folder level, while safely delegating more granular control within a project to the project owner. Virtual Private Cloud (VPC) firewall rules are created at the network level within a given Google Cloud project. Using hierarchical firewall policies, you can create both ingress and egress rules at the organization and folder levels within an organization. This allows security admins to define and deploy consistent firewall rules across a number of projects. Support for Target Service Account in the hierarchical firewall policies also allows security admins to target certain firewall rules to a selected group of instances across the organization without having to define such rules within each individual project. The org- and folder-level rules are automatically applied to existing and new VMs in each relevant project. This means that hierarchical firewall policies can’t be overridden by VPC firewall rules, providing assurance that traffic going in and out of all VMs in an organization is guarded by the most critical rules, such as blocking traffic from specific IP ranges, allowing administration connections to specific IP ranges, and ensuring that traffic from security probers can reach all VMs.To learn more, please read the documentation.Firewall insightsFirewall insights, also available in beta, is a new tool for firewall visibility and optimization that helps you keep your firewall configuration safe and easy to manage. Firewall insights helps you safely optimize your firewall configurations with a number of detection capabilities, including shadowed rule detection to identify firewall rules that have been accidentally shadowed by conflicting rules with higher priorities. In other words, you can automatically detect rules that can’t be reached during firewall rule evaluation due to overlapping rules with higher priorities. You’re also able to detect:Unnecessary allow rules, open ports, and IP ranges and remove them to tighten the security boundarySudden hit increases on firewall rules and drill down to the source of the traffic to catch an emerging attackRedundant firewall rules and clean them up to reduce the total firewall rule countDenied traffic from suspicious sources trying to access unauthorized IP ranges and portsWith metrics reports, you can track firewall utilization to help analyze the usage of firewall rules in your VPC network. This allows security admins to verify that firewall rules are being used in the intended way, ensure that firewall rules allow or block their intended connections, and perform live debugging of connections that are inadvertently dropped due to firewall rules. All firewall metrics are automatically exported to Stackdriver, and you can easily define custom alerts and build custom dashboards to capture interesting conditions that will help you maintain a robust firewall rule set on an ongoing basis.  You can find firewall insights in the Network Intelligence Center, and can use its API integration to integrate insights with the tools of your choice. Check out the video to learn more. We’re committed to keeping your Google Cloud workloads protected, and will continue to develop features to make your firewalls more flexible, manageable, and secure. To learn more check out the Google Cloud firewalls webpage.
Quelle: Google Cloud Platform

Building resilient systems to weather the unexpected

The global cloud that powers Google runs lots of products that people rely on every day—Google Search, YouTube, Gmail, Maps, and more. In this time of increased internet use and virtual everything, it’s natural to wonder if the internet can keep up with, and stay ahead of, all this new demand. The answer is yes, in large part due to an internal team and set of principles guiding the way: site reliability engineering (SRE).  Nearly two decades ago, I was asked to lead Google’s “production team,” which at the time was seven engineers. Today, that team—Site Reliability Engineering, or SRE—has grown to be thousands of Googlers strong. SRE is one of our secret weapons for keeping Google up and running. We’ve learned a lot over the years about planning and resilience, and are glad to share these insights as you navigate your own business continuity and disaster recovery scenarios. SRE follows a set of practices and principles engineering teams can use to ensure that services stay reliable for users. Since that small team formed nearly 20 years ago, we’ve evolved our practices, done a lot of testing, written three books, and seen other companies—like Samsung— build SRE organizations of their own. SRE work can be summed up with a phrase we use a lot around here: Hope is not a strategy; wish for the best, but prepare for the worst. Ideally, you won’t have to face the worst-case scenario—but being ready if that happens can make or break a business.For more than a decade, extensive disaster recovery planning and testing has been a key part of SRE’s practice. At Google, we regularly conduct disaster recovery testing, or DiRT for short: a regular, coordinated set of both real and fictitious incidents and outages across the company to test everything from our technical systems to processes and people. Yes, that’s right—we intentionally bring down parts of our production services as part of these exercises. To avoid affecting our users, we use capacity that is unneeded at the time of the test; if engineers can’t find the fix quickly, we’ll stop the test before the capacity is needed again. We’ve also simulated natural disasters in different locations, which has been useful in the current situation where employees can’t come into the office. This kind of testing takes time, but it pays off in the long run. Rigorous testing lets our SRE teams find unknown weaknesses, blind spots, and edge cases, and create processes to fix them. With any software or system, disruptions will happen, but when you’re prepared for a variety of scenarios, panic is optional. SRE takes into account that humans are running these systems, so practices like blameless post-mortems and lots of communication let team members work together constructively.If you’re just getting started withdisaster recovery planning, you might consider beginning your drills by focusing on small, service-specific tests. That might include putting in place a handoff between on-call team members as they finish a shift, along with continuous documentation to pass on to colleagues. You can also make sure backup relief is accessible if needed. You can also find tips here on common initial SRE challenges and how to meet them.   Inside a service disruptionWith any user-facing service, it’s not a matter of if, but when, a service disruption will happen. Here’s a look at how we handle them at Google. First, it’s important to detect and immediately start work on the issue. Our SREs often carry pagers so they can hear about a critical disruption or outage right away and immediately post to internal admin channels. We page on service-level objectives (SLOs), and recommend customers do the same, so it’s clear that every alert requires human attention.Define roles and responsibilities among on-call SRE team members. Some SREs will mitigate the actual issue, while others may act as project managers or communications managers, updating and fielding questions from customers and non-SRE colleagues.Find and fix the root cause of the problem. The team finds what’s causing the disruption or outage and mitigates it. At the same time, communications managers on the team follow the work as it progresses and add updates on any customer-facing channels.Hand off, if necessary. On-call SREs document progress and hand off to colleagues starting a shift or in the next time zone, if the problem persists that long. SREs also make sure to look out for each other and initiate backup if needed.Finally, write the postmortem. This is a place to detail the incident, the contributing causes, and what the team and business will do to prevent future similar incidents. Note that SRE postmortems are blameless; we assume skill and good intent from everyone involved in the incident, and focus our attention on how to make the systems function better.Throughout any outage, remember that it’s difficult to overcommunicate. While SREs prioritize mitigation work, rotating across global locations to maintain 24×7 coverage, the rest of the business is going about its day. During that time, the SRE team sets a clear schedule for work. They maintain multiple communication channels—across Google Meet, Chat rooms, Google Docs, etc.—for visibility, and in case a system goes down. SRE during COVID-19During this global coronavirus pandemic, our normal incident response process has only had to shift a little. SRE teams were generally already split between two geographic locations. For our employees working in data centers, we’ve separated staff members and taken other measures to avoid coronavirus exposure. In general, a big part of healthy SRE teams is the culture—that includes maintaining work-life balance and a culture of “no heroism.” We’re finding those tenets even more important now to keep employees mentally and physically healthy.For more on SRE, and more tips on improving system resilience within your own business, check out the video that I recently filmed with two of our infrastructure leads, Dave Rensin and Ben Lutch. We discuss additional lessons Google has learned as a result of the pandemic.Planning, testing, then testing some more pays off in the long run with satisfied, productive, and well-informed users, whatever service you’re running. SRE is truly a team effort, and our Google SREs exemplify that collaborative, get-it-done spirit. We wish you reliable services, strong communication, and quick mitigation as you get started with your own SRE practices. Learn more about meeting common SRE challenges when you’re getting started.
Quelle: Google Cloud Platform

Azure Firewall forced tunneling and SQL FQDN filtering now generally available

Two new key features in Azure Firewall—forced tunneling and SQL FQDN  filtering—are now generally available. Additionally, we increased the limit for multiple public IP addresses from 100 to 250 for both Destination Network Address Translation (DNAT) and Source Network Address Translation (SNAT).

Azure Firewall is a cloud native Firewall as a Service (FWaaS) offering that allows you to centrally govern and log all your traffic flows using a DevOps approach. The service supports both application and network level filtering rules and is integrated with the Microsoft Threat Intelligence feed for filtering known malicious IP addresses and domains. Azure Firewall is highly available with built-in auto scaling.

Forced tunneling support now generally available

Forced tunneling lets you redirect all internet bound traffic from Azure Firewall to your on-premises firewall or to chain it to a nearby network virtual appliance (NVA) for additional inspection. You enable a firewall for forced tunneling when you create a new firewall. As of today, it is not possible to migrate an existing firewall deployment to a forced tunneling mode.

To support forced tunneling, service management traffic is separated from customer traffic. An additional dedicated subnet named AzureFirewallManagementSubnet is required with its own associated public IP address. The only route allowed on this subnet is a default route to the internet, and Border Gateway Protocol (BGP) route propagation must be disabled.

Within this configuration, the AzureFirewallSubnet can now include routes to any on-premises firewall or NVA to process traffic before it's passed to the internet. You can also publish these routes via BGP to AzureFirewallSubnet if BGP route propagation is enabled on this subnet.

Figure 1. Azure Firewall in forced tunneling mode.

Avoiding SNAT with forced tunneling

Azure Firewall provides automatic SNAT for all outbound traffic to public IP addresses. Azure Firewall doesn’t SNAT when the destination IP address is a private IP address range per IANA RFC 1918. This logic works perfectly when you egress directly to the internet. However, with forced tunneling enabled, internet-bound traffic ends up SNATed to one of the firewall private IP addresses in AzureFirewallSubnet, hiding the source from your on-premises firewall. You can configure Azure Firewall to not SNAT regardless of the destination IP address by adding “0.0.0.0/0” as your private IP address range. Note that with this configuration, Azure Firewall can never egress directly to the internet. For more information, see Azure Firewall SNAT private IP address ranges.

Figure 2. Azure Firewall doesn’t SNAT private IP prefixes configuration.

Routing to public PaaS and Office 365

While Azure Firewall forced tunneling allows you to direct all internet-bound traffic to your on-premises firewall or a nearby NVA, this is not always desirable. For example, it is likely preferable to egress to public Platform as a Service (PaaS) or Office 365 directly. It is possible to achieve this by adding User Defined Routes (UDR) to the AzureFirewallSubnet with next hop type “Internet” for specific destinations. As this definition is more specific than the default route, it will take precedence. See Azure IP Ranges and Service Tags. and Office 365 IP addresses for more information.

As an alternative approach for egressing directly to public PaaS, you can enable Virtual Network (VNet) service endpoints on the AzureFirewallSubnet. These endpoints extend your virtual network private address space and identity to the Azure PaaS services over a direct connection. When enabled, specific routes to the corresponding PaaS services are automatically created. Service endpoints allow you to secure your critical Azure service resources to your VNet only. Traffic from your VNet to the Azure service always remains on the Microsoft Azure backbone network.

It is important to note that with this configuration, you will not be able to add “0.0.0.0/0” as your private IP prefix as shown previously, but you can still add custom ranges that will not be SNATed.

Finally, it is also possible to use Azure Private Endpoint to connect privately and securely to public PaaS services powered by Azure Private Link. However, these connections will bypass your default route to Azure Firewall as described in this documentation. If you require all traffic to go via your firewall, you can mitigate by adding a UDR on all client subnets with the Private Endpoint IP address and a /32 suffix as the destination and Azure Firewall as the next hop. Note that for this configuration to work and for the returned traffic from your private endpoint to go via your firewall as well, you will have to always SNAT, by using 255.255.255.255/32 as your private IP address range.

Figure 3. A UDR to a Storage Private Endpoint pointing to the firewall as a next hop.

SQL FQDN filtering now generally available

You can now configure SQL FQDNs in Azure Firewall application rules. This allows you to limit access from your VNet to only the specified SQL Server instances. You can filter traffic from VNets to an Azure SQL Database, Azure SQL Data Warehouse, Azure SQL Managed Instance, or SQL IaaS instances deployed in your VNets.

SQL FQDN filtering is currently supported in proxy-mode only (port 1433). If you use non-default ports for SQL Infrastructure as a Service (IaaS) traffic, you can configure those ports in the firewall application rules.

If you use SQL in the default redirect mode, you can still filter access using the SQL service tag as part of network rules. Adding redirect mode support to application rules is on our roadmap.

Figure 4. SQL FQDN filtering in Azure Firewall application rules.

Multiple public IP addresses limit increase

You can now use up to 250 public IP addresses with your Azure Firewall for both DNAT and SNAT.

DNAT—You can translate multiple standard port instances to your backend servers. For example, if you have two public IP addresses, you can translate TCP port 3389 (RDP) for both IP addresses.
SNAT—Additional ports are available for outbound SNAT connections, reducing the potential for SNAT port exhaustion. Currently, Azure Firewall randomly selects the source public IP address to use for a connection. If you have any downstream filtering on your network, you need to allow all public IP addresses associated with your firewall. Consider using a public IP address prefix to simplify this configuration.

For more information see Deploy an Azure Firewall with multiple public IP addresses.

Next steps

For more information on everything we covered here, see the following:


Azure Firewall documentation
Azure Firewall forced tunneling
SQL FQDN filtering with Azure Firewall
Azure Firewall–multiple public IP addresses
What is Azure Firewall Manager preview
Use Azure Firewall for secure and cost-effective Windows Virtual Desktop protection

Quelle: Azure

Azure Files enhances data protection capabilities

Protecting your production data is critical for any business. That’s why Azure Files has a multi-layered approach to ensuring your data is highly available, backed up, and recoverable. Whether it’s a ransomware attack, a datacenter outage, or a file share that was accidentally deleted, we want to make sure you can get everything backed up and running again pronto. To give you a peace of mind with your data in Azure Files, we are enhancing features including our new soft delete feature, share snapshots, redundancy options, and access control to data and administrative functions.

Soft delete: a recycle bin for your Azure file shares

Soft delete protects your Azure file shares from accidental deletion. To this end, we are announcing the preview of soft delete for Azure file shares. Think of soft delete like a recycle bin for your file shares. When a file share is deleted, it transitions to a soft deleted state in the form of a soft deleted snapshot. You get to configure how long soft deleted data is recoverable for before it is permanently erased.

Soft-deleted shares can be listed, but to mount them or view their contents, you must undelete them. Upon undelete, the share will be recovered to its previous state, including all metadata as well as snapshots (Previous Versions).

We recommend turning on soft delete for most shares. If you have a workflow where share deletion is common and expected, you may decide to have a very short retention period or not have soft delete enabled at all. Soft delete is one part of a data protection strategy and can help prevent inadvertent data loss.

Soft delete is currently off by default for both new and existing storage accounts, but it will be enabled by default for new storage accounts in the portal later this year. In the API, it will be on by default beginning January 1, 2021. You can toggle the feature on and off at any time during the life of a storage account. The setting will apply to all file shares within the storage account. If you are using Azure Backup, soft delete will be automatically enabled for all protected instances. Soft delete does not protect against individual file deletions—for those, you should restore from your snapshot backups. To learn more about soft delete, read Prevent accidental deletion of Azure file shares.

Snapshot backups you can restore from

Snapshots are read-only, point-in-time copies of your Azure file share. They’re incremental, meaning they’re very efficient—a snapshot only contains as much data as has changed since the previous snapshot. You can have up to 200 snapshots per file share and retain them for up to 10 years. You can either manually take these snapshots in the Azure portal, via PowerShell, or command-line interface (CLI), or you can use Azure Backup, which recently announced that the snapshot management service for Azure Files is now generally available. Snapshots are stored within your file share, meaning that if you delete your file share, your snapshots will also be deleted. To protect your snapshot backups from accidental deletion, ensure soft delete is enabled for your share.

Azure Backup handles the scheduling and retention of snapshots, you define the backup policy you want when setting up your Recovery Services Vault, and then Backup does the rest. Its new grandfather-father-son (GFS) capabilities mean that you can take daily, weekly, monthly, and yearly snapshots, each with their own distinct retention period. Azure Backup also orchestrates the enablement of soft delete and takes a delete lock on a storage account as soon as any file share within it is configured for backup. Lastly, Azure Backup provides certain key monitoring and alerting capabilities that allow customers to have a consolidated view of their backup estate.

You can perform both item-level and share-level restores in the Azure portal using Azure Backup. All you need to do is choose the restore point (a particular snapshot), the particular file or directory if relevant, and then the location (original or alternate) you wish you restore to. The backup service handles copying the snapshot data over and shows your restore progress in the portal.

If you aren’t using Azure Backup, you can perform manual restores from snapshots. If you are using Windows and have mounted your Azure file share, you can use File Explorer to view and restore from snapshots using the “Previous Versions” API (meaning that users can perform item-level restores on their own). When restoring from a single file, it picks up any versions that were different in previous snapshots. When used on an entire share, it will show all snapshots that you can then browse and copy from.

You can also restore by copying data from your snapshots using your copy tool of choice. We recommend using AzCopy (requires the latest version, v10.4) or Robocopy (requires port 445 to be open). Alternatively, you can simply mount your snapshot and then do a simple copy and paste of the data back into your primary.

If you are using Azure File Sync, you can also utilize server-side Volume Shadow copy Service (VSS) snapshots with Previous Versions to allow users to perform self-service restores. Note that these are different from snapshots of your Azure file share and can be used alongside—but not as a replacement for—cloud-side backups.

Data replication and redundancy options

Azure Files offers different redundancy options to protect your data from planned and unplanned events ranging from transient hardware failures, network and power outages, to massive natural disasters. All Azure file shares can use locally-redundant (LRS) or zone-redundant storage (ZRS). Geo-redundant (GRS) and geo-zone-redundant storage (GZRS) is available for standard file shares under 5 TB and we are actively working on geo-redundant storage for standard file shares of up to 100 TiB.

You can achieve geographic redundancy for your premium file shares in the following ways. You can set up Azure File Sync to sync between your Azure file share (your cloud endpoint) and a mounted file share running on a virtual machine (VM) in another Azure region (your server endpoint). You must disable cloud tiering to ensure all data is present locally (note that your data on the server endpoint may be up to 24 hours outdated, as any changes made directly to the Azure file share are only picked up when the daily change detection process runs). It is also possible to create your own script to copy data to a storage account in secondary region using tools such as AzCopy (use version 10.4 or later to preserve access control lists (ACLs) and timestamps).

Access control options to secure your data

Another part of data protection is securing your data. You have a few different options for this. Azure Files has long supported access control via the storage account key, which is Windows Challenge/Response (NTLM)-based and can be rotated on a regular basis. Any user with storage account key access has superuser permissions. Azure Files also now supports identity-based authentication and access control over Server Message Block (SMB) using on-premises Active Directory (preview) or Azure Active Directory Domain Services (Azure AD DS). Identity-based authentication is Kerberos-based and allows you to enforce granular access control to your Azure file shares.

Once either Azure AD or on-premises Azure AD DS is configured, you can configure share-level access via built-in Role-based Access Control (RBAC) roles or configure custom access roles for Azure AD identities, and you can also configure directory and file-level permissions using standard Windows file permissions (also known as NTFS ACLs).

Multiple data protection strategies for Azure Files

Azure Files gives you many tools to protect your data. Soft delete for Azure file shares protects against accidental deletion, while share snapshots are point-in-time copies of your Azure file share that you can take manually or automatically via Azure Backup and then restore from. To ensure high availability, you have a variety of replication and redundancy options to choose from. In addition, you can ensure appropriate access to your Azure file share with identity-based access control.

Let us know what you think

We look forward to hearing your feedback on these features and suggestions for future improvements through email at azurefiles@microsoft.com. You can also upvote or add new suggestions for Azure Files via UserVoice.
Quelle: Azure

Azure Machine Learning—what’s new from Build 2020

Machine learning (ML) is gaining momentum across a number of industries and scenarios as enterprises look to drive innovation, increase efficiency, and reduce costs. Microsoft Azure Machine Learning empowers developers and data scientists with enterprise-grade capabilities to accelerate the ML lifecycle. At Microsoft Build 2020, we announced several advances to Azure Machine Learning across the following areas: ML for all skills, Enterprise grade MLOps, and responsible ML.

ML for all skills

New enhancements provide ML access for all skills.

Enhanced notebook in preview

Data scientists and developers can now access an enhanced notebook editor directly inside Azure Machine Learning studio. New capabilities to create, edit, and collaborate make remote work and sharing easier for data science teams and the notebook is fully compatible with Jupyter.

Boost development productivity with features like IntelliSense, inline error highlighting, and code suggestions from VSCode, which deliver the best-in-class coding experience in Jupyter notebooks.
Access real-time co-editing (coming soon) for seamless remote collaboration or pair debugging.
Inline controls to start, stop, and create a new compute using GPU or CPU Compute Instance inside notebooks.
Add new kernels to the notebook editor and quickly switch between different kernels like Python and R.

Real-time notebook co-editing with three users and IntelliSense.

Reinforcement learning support in preview

New reinforcement learning support in Azure Machine Learning enables data scientists to train agents who interact with the real world, such as control systems and game characters. To train agents on Azure Machine Learning, data scientists can use the SDK, studio UI, or command line interface (CLI). Azure Machine Learning simplifies running reinforcement learning at scale on remote compute clusters, including tracking experiment results in Tensorboard and Azure Machine Learning studio UI. See sample notebooks to train an agent to navigate a lava maze in Minecraft using Azure Machine Learning.

An agent successfully navigates the maze in Minecraft.

Data labeling in preview

Projects that have a computer-vision component, such as image classification or object detection, generally require labels for thousands of images. Data labeling in Azure Machine learning gives you a central place to create, manage, and monitor labeling projects. Use it to coordinate data, labels, and efficiently manage labeling tasks. The new ML assisted labeling feature helps trigger automatic machine learning models to accelerate the labeling task and is available for image classification (multi-class or multi-label) and object detection tasks.

Enterprise-grade MLOps

New features for MLOps designed to deliver innovation faster.

Azure Private Link for network isolation in preview

To enable secure model training and deployment, Azure Machine Learning provides a strong set of data and networking protection capabilities. These include support for Azure Virtual Networks, dedicated compute hosts and customer managed keys for encryption in transit and at rest. In addition, we are enabling Private Link for network isolation to access Azure Machine Learning over a private endpoint in your virtual network, so the Azure Machine Learning workspace will not be accessible to the internet. This is critical for many scenarios in regulated industries like financial services, insurance, and healthcare.

Azure Cognitive Search integration in preview

Many enterprises have a large corpus of documents and can build cognitive search solutions to search for specific terms and find relevant results to improve productivity. To build an effective solution, often customized models are needed to enrich the search experience. Using Azure Machine Learning, developers can deliver custom search solutions by training and deploying models and now, seamlessly integrating the end points into the Azure Cognitive Search skillset.

Responsible ML

In collaboration with the Aether Committee and its working groups, we are bringing the latest research in responsible AI to Azure. The new responsible ML capabilities in Azure Machine Learning and our open-source toolkits empower data scientists and developers to understand ML models, protect people and their data, and control the end-to-end ML process. To learn more, read the responsible ML announcements from Build.

Innovating with customers

We continue to drive this innovation hand-in-hand with you, our customers. For example, Carhartt turned to Azure Machine Learning for quantitative insights to help their company get the right products to the places its customers work and live.

“The model we deployed on Azure Machine Learning helped us choose the three new retail locations we opened in 2019. Those stores exceeded their revenue plans by over 200 percent in December, the height of our season, and within months of opening were among the best-performing stores in their districts.” —Jolie Vitale, Director of BI and Analytics, Carhartt.

Start building today!

We hope you will join us and start your journey with Azure Machine Learning.

Get started with a free trial of Azure Machine Learning.
Learn more about Azure Machine Learning and follow the quick start guides and tutorials.

Quelle: Azure

How To Manage Docker Hub Organizations and Teams

Docker Hub has two major constructs to help with managing users access to your repository images. Organizations and Teams. Organizations are a collection of Teams and Teams are a collection of DockerIDs.

There are a variety of ways of configuring your Teams within your Organization. In this blog post we’ll use a fictitious software company named Stark Industries which has a couple of development teams. One which works on the front-end of the application and the other that works on the back-end of the application. They also have a QA team and a DevOps team. 

We’ll want to set up our Teams so that each engineering team can push and pull the images that they create. We’ll give the DevOps team access privileges to pull images from the dev teams repos and the ability to push images to the repos that they own. We’ll also give the QA team read-only access to all the repos.

Organizations

In Docker Hub, an organization is a collection of teams. Image repositories can be created at the organization level. We are also able to configure notifications and link to source code repositories.

Let’s set up our Organization.

Open your favorite browser and navigate to Docker Hub. If you do not already have a Docker ID you can create from the main page.

Login Hub with the account that you would like to be the owner of the Organization. Don’t worry if you are not 100% sure which Docker ID you would like to use as the owner, you can add more owners later if need be.

Once you are logged, navigate to the Organizations page by clicking on the Organization link in the top navigation bar.

Let’s create a new organization. Click on the “Create Organization” button in the top right. You will be presented with the option to choose between the Free Team or the Team plans. You can find more information about the plans on our pricing page.

We will be using the Team plan in this blog post.

Once you’ve selected the Team plan, you’ll walk through the steps of setting up the Organization.

First enter the Organization’s name and description.

Now choose the number of users you would like to initially start with. The Team plan comes with 5 users and you can always add more later.

Now you’ll be presented with a screen to enter your payment information.

Once you click purchase and your credit card is approved, you will land on your newly created Organization home page.

And there you have it, we’ve created our Organization that we can now start adding Teams to.

Teams

In Docker Hub, Teams are a collection of Docker IDs. We will use this construct to group users and assign privileges to image repositories that are owned by the Organization.

Let’s set up our Teams now.

Back on your organization’s homepage, click on the tab for Teams and then click the blue “Create Team” button.

Enter a name and description for your team.

Create the following four teams:

backendeng

Back-end Engineering Teams

frontendeng

Front-end Engineering Team

qaeng

QA Engineering Team

devopseng

DevOps Engineering Team

Now that we have our teams set up, let’s add users to each team.

Adding a user to a team is pretty straightforward. Select one of the teams from the list. Then click the blue “Add Member” button. Now, go ahead and enter the Docker ID of the user you want to add.

Go ahead and add at least one user to each of your teams.

Image Repository Permissions

Okay, now that we have our Organization and Teams set up. Let’s configure permissions for our image repositories. 

Before we do that, let’s talk a little bit about workflow. We currently have two development teams that are writing code for our application. They work on feature creation and defect fixes. They also are responsible for writing the Dockerfiles that will be used by DevOps to build out the CI/CD pipeline. 

Also, the development teams (front-end and back-end) should have Admin rights to the images they create. They will also have read permissions to the images that DevOps creates

Once a development team commits and pushes a change to the application, the CI/CD pipeline should kick off and build the images, run tests and push into our repository. 

In this fictitious scenario, we do not have fully automated CI/CD into production because we want our QA team to test the application in our test environment and then approve the build. So, once the QA CI/CD pipeline has been run and pushed a build into the QA environment. QA will test and report defects. These defects will be tagged with the current image tag that the team is testing on. This way the development team can then pull and run that specific tag and reduce the complexity of reproducing the error.

Once the QA team has approved the build, they will then kick-off a CI/CD pipeline that will again build the image but this time, it will name and tag the image with a different image repository. One that is meant for a release. The QA team will have read and write access to this repository and the development teams will have read access.

The DevOps team will have Admin rights to all the image repositories that are in the CI/CD pipeline except the ones that are owned by the development teams. This way they have full control to set and manage the CI/CD pipeline.

Create Image Repos and Permissions

Let’s create the image repositories that our teams will use. We can also then set up the correct permissions for our teams.

Click the “Repositories” link in the top navigation. Then click the blue Create Repository button. Fill out the following form.

Choose your organization from the dropdown and then give your new image a name. Fill out the optional description and then choose Private. Once done, click the “Create” button.

You will need the following image repositories:

Now let’s assign permissions to our teams. Navigate to the Organization’s dashboard by clicking the “Organizations” link in the top navigation. Click the Organization that you want to manage. In our case, we’ll choose “starkmagic”. Now click the “Teams” tab.

Let’s start with the development teams. Click on the “frontendeng” Team to view it’s details. Then click the “Permissions” tab.

From the drop down menu, choose the “ironsuit-ui-build” repository and then choose “Admin” from the permissions dropdown.

You’ll notice that the description of the “Admin” privilege is displayed to the left of the UI.

Click the blue “Add” button. 

We also want to assign “read-only” permissions to the other three image repositories.

Now do the same for the backend engineering team. Assign the “backendeng” team “Admin” permissions to the “ironsuit-api-build” and “read-only” to the other three image repositories.

Now let’s set up permissions for the QA team.

Follow the same steps above to assign “Read & Write” permissions to the following image repositories:

ironsuit-uiIronsuit-api

Now assign “Read-only” permissions to the other images.

The final Team that we need to configure permissions for is the DevOps team. They will have “Admin” access to all images to allow the team to manage the full CI/CD pipeline.

Follow the steps above to grant “Admin” permissions to all the images for the “devopseng” team.

Conclusion

Docker Hub has a simple yet extremely powerful Roles Based Access Control system to allow you to use Organizations and Teams to group and manager users permissions to image repositories. This allows distributed teams to own their own repos but collaborate across the organization and accelerate development workflow.

To learn more about Teams and Organizations checkout our documentation.
The post How To Manage Docker Hub Organizations and Teams appeared first on Docker Blog.
Quelle: https://blog.docker.com/feed/