Disney+: Surround-Ton nur auf drei Fire-TV-Modellen
Disney+ bietet auf den meisten Fire-TV-Modellen nur Stereoklang. Von Ingo Pakalski (Disney+, Amazon)
Quelle: Golem

Disney+ bietet auf den meisten Fire-TV-Modellen nur Stereoklang. Von Ingo Pakalski (Disney+, Amazon)
Quelle: Golem

Ob TSMC, größte Halbleiter-Auftragsfertiger der Welt, dass akzeptiert, ist fraglich. (Huawei, Prozessor)
Quelle: Golem
In the last few years, the teams working on the block editor have learned a lot about how people build sites now and how they want to build sites in the future.
The latest version represents the culmination of these discoveries, and the next stage in the editor’s evolution.
With better visuals and more advanced features, it’ll keep designers, developers, writers, and editors productive and happy, and — tension-building drumroll — it’s in your editor right now!
What’s new
With a comprehensive visual refresh, a plethora of new features, and dozens of bug fixes, the new block editor comes with a lot to unpack.
What follows is just a small (but delectable) sample of the many ways we’ve upgraded your editing experience. (You can get the full list of goodies in the release notes.)
We hope you enjoy.
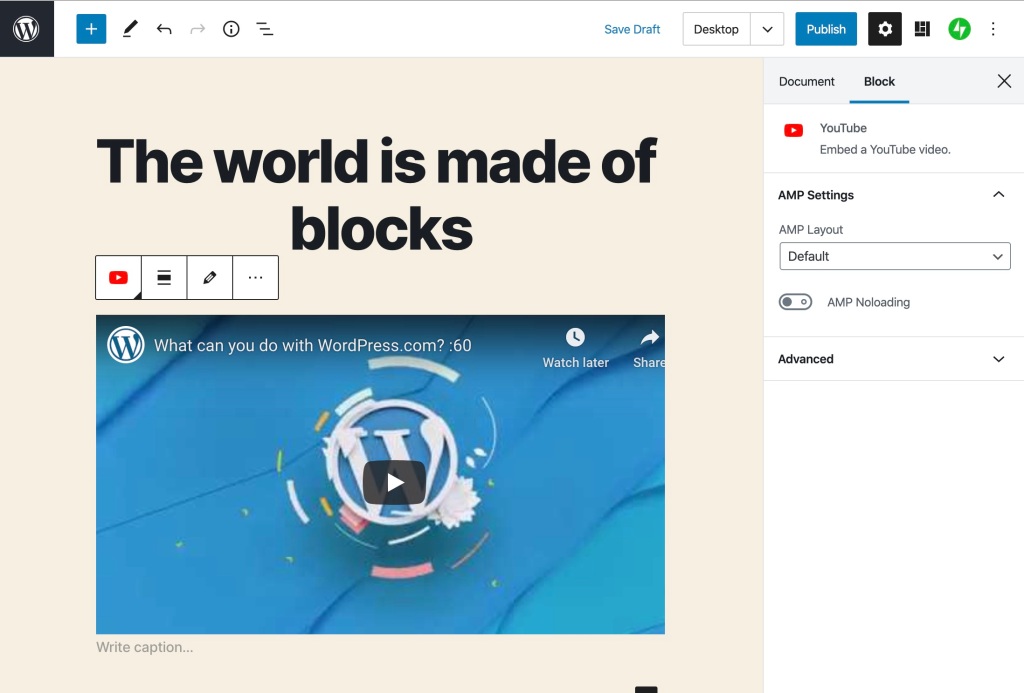
A revamped editor UI
The first thing you’ll notice is the slick UI. Buttons, icons, text, and dropdowns are all sporting a contrast boost, with bolder colors and more whitespace between buttons, text labels, and menu items.
The new block editor’s UI
As you navigate through the editor’s menus, individual items are clearly highlighted, allowing you to quickly identify what you’ve selected.
Active menu items have distinct highlights
The block toolbars are now simpler, displaying the most commonly-used features. For example, paragraph blocks show only bold, italic, and link formatting buttons. You’ll find all the extra options in the dropdown menu.
The block toolbar options are simpler and uncluttered
What’s more, instead of listing blocks within a fixed-height container, the block inserter now spans the height of the window. You’ll now see more blocks and block categories at once with less scrolling.
The block inserter spans the full height of your screen
Introducing block patterns
With the block editor as your canvas you can design almost any layout you can imagine – but building intricate page structures should never get in the way of your creative process.
Here’s where the blocks really shine: along with individual blocks, the editor now includes block patterns, a library of predefined and reusable block layouts, that you use on any page or post.
To check out the list of available patterns, click on the block pattern icon (on the top right) to reveal a collection of pre-built layouts:
Block patterns are groups of individual blocks combined to create elegant layouts
Pick the pattern you want to use, and it will appear in your editor ready for you to customize with your own content.
Right now, you’ll find a few introductory patterns – Two Columns of Text, Two Buttons, Cover, and Two Images Side by Side – but we’ll be adding more and more patterns as they’re available. When the block patterns API opens up to third-party authors, you’ll also be able to develop and share your own.
(Have an idea for a great pattern? The block editor developer community is actively seeking ideas. The more ideas they receive, the better your editor will be!)
Colors, colors everywhere
When it comes to words and columns, websites aren’t newspapers: things don’t have to be black and white.
Use the new Text Color selector tool to change the color of sentences, and even individual words and letters. Highlight the text you’d like to change, then click on the arrow dropdown and select “Text Color.”
Select “Text Color” from the options
Pick the color of your word or character
To change the background colors of your columns, select the column and head to the sidebar, to Color settings.
Columns get background colours too!
The road ahead is paved with blocks
There’s still a long way to go, and the editor’s community of contributors hasn’t given its collective keyboards a moment’s rest. Work on polishing UI elements like the sidebar and dropdowns continues along with advancements to block patterns and other exciting features.
Are there ways we could improve the site editing experience even more? Please let us know! We’re always keen to hear how we can make the web a better place for everyone.
Quelle: RedHat Stack

If you use Office 365, you have likely seen the Microsoft PowerPoint Designer appear to offer helpful ideas when you insert a picture into a PowerPoint slide. You may also have found it under the Home tab in the ribbon. In either case, Designer provides users with redesigned slides to maximize their engagement and visual appeal. These designs include different ways to represent your text as diagrams, layouts to make your images pop, and now it can even surface relevant icons and images to bring your slides to the next level. Ultimately, it saves users time while enhancing their slides to create stunning, memorable, and effective presentations.
Designer uses artificial intelligence (AI) capabilities in Office 365 to enable users to be more productive and unlock greater value from PowerPoint. It applies AI technologies and machine learning based techniques to suggest high-quality professional slide designs. Content on slides such as images, text, and tables are analyzed by Designer and formatted based on professionally designed templates for enhanced effectiveness and visual appeal.
The data science team, working to grow and improve Designer, is comprised of five data scientists with diverse backgrounds in applied machine learning and software engineering. They strive to continue pushing barriers in the AI space, delivering tools that make everyone’s presentation designs more impactful and effortless. They’ve shared some of the efforts behind PowerPoint Designer, just so we can get a peek under the hood of this powerful capability.
PowerPoint Designer capabilities
Designer has been processing user requests in the production environment for several years and uses machine learning models for problems such as image categorization, content recommendation, text analysis, slide structure analysis, suggestion ranking, and more. Since its launch, Designer users have kept 1.7 billion Designer slides in their presentations. This means the team needs a platform to run their models at a large scale. Plus, the Designer team is regularly retraining models in production and driving model experimentation to provide optimized content recommendations.
Recently, the data analysis and machine learning team within PowerPoint started leveraging Azure Machine Learning and its robust MLOps capabilities to build models faster and at scale, replacing local development. Moving toward content suggestions, like background images, videos, and more, requires a highly performant platform, further necessitating the shift towards Azure Machine Learning.
The team uses Azure Machine Learning and its MLOps capabilities to create automated pipelines that can be iterated on, without disrupting the user experience. The pipeline starts at the Azure Data Lake, where the data is stored. From there, the team gathers data and preprocesses it—merging data from different sources and transforming raw data into a format that models can understand. Utilizing the Azure Machine Learning distributed training, they retrain their current models weekly or monthly. Distributed training allows the team to train models in parallel across multiple virtual machines (VMs) and GPUs (graphic processing units). This saves the team considerable time to ensure the model training doesn’t disrupt the user experience for the data science team, so they can focus on other objectives like experimentation.
The team does experimentation in parallel as well—trying variants, or hyperparameters, and comparing results. The final model is then put back into Azure Data Lake and downloaded to Azure Machine Learning.
The following diagram shows the conceptualized, high-level architecture of data being used from local caches in Azure Data Lake to develop machine learning models on the Azure Machine Learning. These models are then integrated into the micro-service architecture of the Designer backend service that presents PowerPoint users with intelligent slide suggestions.
Benefits of Azure Machine Learning for the PowerPoint team
The PowerPoint team decided to move its workloads over to the Azure Machine Learning based on the following capabilities:
Supports Python notebooks which can be accessed on any machine through the browser.
Natively supports running the latest TensorFlow and PyTorch-based algorithms and pre-trained models.
Experimentation is very easy to set up with minimal ramp-up time It allows execution locally or on the cloud seamlessly thereby presenting developers with a hybrid environment.
Azure Machine Learning is one of Microsoft’s key AI investments.
Follow the Azure blog to be the first to know when features leveraging new models that recommend more types of content, such as image classification and content recommendations, are released.
Azure Machine Learning | Azure Data Lake | Azure Machine Learning pipelines
Learn more
Learn more about Azure Machine Learning.
Get started with a free trial of Azure Machine Learning.
Quelle: Azure
We are proud to host many websites for language tutors, yoga schools, and personal fitness coaches around the world.
It’s exciting to see how educators and consultants across different industries are getting creative with their online offerings: language teachers conduct 1:1 sessions to help students hone pronunciation, yoga studios live-stream group sessions, and instructors lead writing boot camps via Zoom breakout rooms. Even my own strength coach is monitoring my workouts — I launch the camera on my phone, place it against the wall, and do deadlifts while he supervises.
Last year we launched Recurring Payments to support creators, consultants, small businesses, and other professionals in establishing dependable income streams. We were very pleased to discover that online educators using this feature are thriving as well!
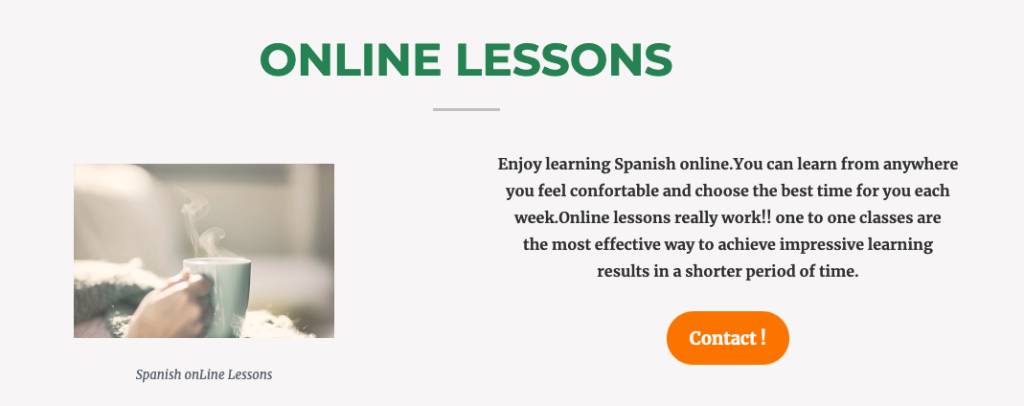
Marta, for example, runs Spanish Teacher Barcelona, a Spanish language school located in — you guessed it! — Barcelona. She offers 1:1 sessions and classes in a coworking space in the city’s Gracia neighborhood. For customers that cannot meet in person, she hosts private lessons online, available with a subscription. She offers three subscription plans to meet the variety of needs of her students.
Ready to set up your own subscription-based service or move your existing classes online? Here’s a quick guide to get you set up with the right tools, so you can focus instead on providing the best educational environment possible.
Set up your online class today
Below, we’ll cover the steps you can take to get your classes or private lessons up and running with the Recurring Payments feature. We’ll also recommend tools to make scheduling 1:1 sessions and operating your classes easier, like the Calendly block and various video conferencing tools.
1. Create a “Subscribe” page to promote your class or service
You need to convince your customers that your subscription is worth paying for. A typical way to do this is with a “Subscribe” page where you explain the benefits of your services.
Take a look at the “Join” page on Longreads.com, an online publication that publishes and curates nonfiction storytelling on the web and funds stories with memberships:
A few tips to make your offer irresistible:
Focus on the benefits for the customer.Provide a few subscription options, such as classes at different frequencies and at different price points.Add testimonials if you can — people love to read reviews.
Create this page by going to My Sites → Pages → Add New.
2. Add a subscription with the Recurring Payments feature
Recurring Payments allows you to create renewable payments. Your subscribers will enter their credit card details, and will then be charged automatically every month or every year.
Recurring Payments is currently available on any of our paid plans. To get started, you’ll need to create a Stripe account, which is a global money transfer service. We partner with Stripe to make sure payments end up safely in your bank account.
You can start collecting Recurring Payments in five minutes.
On the “Subscribe” page you created above, search for the “Recurring Payments” block:
After clicking “Connect to Stripe,” you’ll be able to connect your existing Stripe account or create a new one.
Now you can create your first subscription.
Set the price, frequency (we recommend monthly for start), and the title of your subscription, like Writing Bootcamp, 3 breakout sessions/month or Conversational French for Beginners, 4 classes/month.
That’s it! Your subscription is now created. Once you publish the page and activate your Stripe account, your customers will be able to subscribe to this service.
Subscriptions are dependable: your subscribers will be automatically charged at the beginning of the next renewal period (in a month or a year). You don’t have to remind or nudge them, and they also don’t have to remember to pay you — everything is handled.
For more details, please read this Recurring Payments support article.
Would you rather sell access to your services as a one-time purchase? Check out the Simple Payments feature.
3. Schedule your lessons
Your subscribers can set up a time for their lessons using a service like Calendly, a handy tool that allows them to select a free slot in your schedule. We recently created the Calendly block to bring some of the service’s key features to you. While editing your page, search for the “Calendly” block.
Remember to check if the subscription is activeBefore hopping on an online meeting, you need to confirm that the person scheduling a call is indeed a paying subscriber. Check the list of your active Recurring Payments subscribers located in your WordPress.com dashboard under My Sites → Earn → Payments.Read more about managing your list of subscribers.
4. Select a tool to host your class
Video conferencing tools are very useful for teaching. Apart from seeing the other person, you can share your screen, send files, or even host a session for multiple people, lecture-style.
You can use Google Hangouts, Skype, or Zoom (which is what we use for our meetings here at WordPress.com). Zoom has put together a handy tutorial for teachers.
If you’d like additional setup tips on selecting a theme for your website, adding content and media, and adding students as viewers or contributors, read our support tutorial on building a virtual classroom.
What amazing class are you going to launch?
Quelle: RedHat Stack

Neben den Control-Machern bekommen auch die Studios hinter The Last Guardian und Limbo finanzielle und logistische Unterstützung. (Epic Games, Playstation 4)
Quelle: Golem

In China wird bei Huawei wieder relativ normal gearbeitet. Außer in Hubei gab es keine am Coronavirus erkrankten Beschäftigten. (Coronavirus, Huawei)
Quelle: Golem

In Chromium und Chrome Canary gibt es zwei neue Optionen, die die Anzeige von WWW und HTTPS wieder ermöglichen. (Chrome, Google)
Quelle: Golem

Zwar will Hamburgs Datenschützer die Nutzung von Skype durch Schulen in der Corona-Krise nicht direkt verbieten. Doch gut findet er sie nicht. (Coronavirus, Skype)
Quelle: Golem

We're announcing the general availability of incremental snapshots of Azure Managed Disks. Incremental snapshots are a cost-effective, point-in-time backup of managed disks. Unlike current snapshots, which are billed for the full size, incremental snapshots are billed for the delta changes to disks since the last snapshot and are always stored on the most cost-effective storage, Standard HDD storage irrespective of the storage type of the parent disks. For additional reliability, Managed Disks are also stored on Zone Redundant Storage (ZRS) by default in regions that support ZRS.
Incremental snapshots provide differential capability, enabling customers and independent solution vendors (ISVs) to build backup and disaster recovery solutions for Managed Disks. It allows you to get the changes between two snapshots of the same disk, thus copying only changed data between two snapshots across regions, reducing time and cost for backup and disaster recovery. Incremental snapshots are accessible instantaneously; you can read the underlying data of incremental snapshots or restore disks from them as soon as they are created. Azure Managed Disk inherit all the compelling capabilities of current snapshots and have a lifetime independent from their parent managed disks and independent of each other.
Examples of incremental snapshots
Let’s look at a few examples to understand how the incremental snapshots help you reduce cost.
If you were using a disk with 100 GiB already occupied and added 20 GiB of data to the disk, you took the first incremental snapshot before 20 GiB of data was added to the disk, making the first copy occupy 100 GiB of data. Then 20 GiB of data was added on the disk before you created the second incremental snapshot. Now with incremental snapshots, the second snapshot occupies only 20 GiB and you’re billed for only 20 GiB compared to the current full snapshots that would have occupied 120 GiB and billed for 120 GiB of data, reducing your cost.
The second incremental snapshot references 100 GiB of data from the first snapshot. When you restore the disk from the second incremental snapshot, the system can restore 120 GiB of data by copying 100 GiB of data from the first snapshot and 20 GiB of data from the second snapshot.
Let's now understand what happens when 5 GiB of data was modified on the disk before you took the third incremental snapshot. The third snapshot then occupies only 5 GiB of data, references 95 GiB of data from the first snapshot, and references 20 GiB of data from the second snapshot.
Now, if you deleted the first incremental snapshot the second and the third snapshots continue to function normally as incremental snapshots are independent of each other. The system merges the data occupied by the first snapshot with the second snapshot under the hood to ensure that the second and the third snapshots are not impacted due to the deletion of the first snapshot. The second snapshot now occupies 120 GiB of data. Since we launched the preview for incremental snapshot in September 2019, our ISVs have used this capability on a wide range of workloads to reduce the cost and time for backup and disaster recovery.
Below are some quotes from partners in our preview program:
“Zerto has been helping enterprise customers who leverage Microsoft Azure become IT Resilient for years. Extending Azure Managed Disks with the incremental snapshots API has enabled Zerto to improve upon industry-best RTOs and RPOs in Azure. The powerful capabilities of Azure Managed Disks enable Zerto to meet the scale and performance requirements of a modern enterprise. With Zerto and Microsoft’s continued collaboration and integration, we’ll continue to pave the way for IT Resilience in the public cloud.” – Michael Khusid, Director of Product Management, Zerto, Inc.
“Combining Rubrik Azure data protection with the latest Microsoft API delivering incremental snapshots, we reduce the time and cost for backup and recovery, and help our joint customers achieve 18x lower costs, high storage efficiency, reduced network traffic, and hourly RPOs. Together, Rubrik and Microsoft enable our enterprise customers to accelerate their cloud journey while unlocking productivity and better cloud economics.” – Shay Mowlem, Senior Vice President of Product & Strategy, Rubrik
“With incremental snapshots of Azure managed disks, Dell EMC PowerProtect Cloud Snapshot Manager (CSM) customers will be able to reduce their backup times and storage costs significantly. Also, they’ll be able to achieve much shorter recovery time objectives with instant access to their data from snapshots. Designed for any-size cloud infrastructure, CSM provides global visibility and control to gain insights into data protection activities across Azure subscriptions, making CSM a great solution for protecting customer workloads in public cloud environments.” – Laura Dubois, vice president, product management, Dell Technologies Data Protection
Availability and pricing
You can now create incremental snapshots in all regions, including sovereign regions.
Incremental snapshots are charged per GiB of the storage occupied by the delta changes since the last snapshot. For example, if you're using a managed disk with a provisioned size of 128 GiB, with 100 GiB used, the first incremental snapshot is billed only for the used size of 100 GiB. 20 GiB of data is added on the disk before you create the second snapshot. Now, the second incremental snapshot is billed for only 20 GiB.
Incremental snapshots are always stored on standard storage irrespective of the storage type of parent managed disks and charged as per the pricing of standard storage. For example, incremental snapshots of a Premium SSD Managed Disk are stored on standard storage. They are stored on ZRS by default in regions that support ZRS. Otherwise, they are stored on locally redundant storage (LRS). The per GB pricing of both the LRS and ZRS options is the same.
Incremental snapshots cannot be stored on premium storage. If you are using current snapshots on premium storage to scale up virtual machine deployments, we recommend you use custom images on standard storage in Shared Image Gallery. This will help you to achieve higher scale with lower cost.
You can visit the Managed Disk Pricing for more details about the snapshot pricing.
Getting started
Create an incremental snapshot using CLI.
Create an incremental snapshot using PowerShell.
Quelle: Azure