Need for Speed Heat angespielt: Mit Vollgas durch Florida
Keine Lootboxen und kein Onlinezwang, aber eine schicke Grafik und spannende Verfolgungsjagden: Golem.de hat Need for Speed Heat probegefahren. (Gamescom 2019, Rennspiel)
Quelle: Golem

Keine Lootboxen und kein Onlinezwang, aber eine schicke Grafik und spannende Verfolgungsjagden: Golem.de hat Need for Speed Heat probegefahren. (Gamescom 2019, Rennspiel)
Quelle: Golem
Amazon FSx for Windows File Server, ein Service, der ein vollständig verwaltetes natives Microsoft Windows-Dateisystem bietet, sorgt dafür, dass Windows-Schattenkopien auf allen Dateisystemen verfügbar sind. Nach der Einführung am 31. Juli 2019 konnte dieser Service zunächst nur auf neu erstellten Amazon FSx-Dateisystemen genutzt werden. Ab sofort können Kunden Schattenkopien auf allen verfügbaren Dateisystemen nutzen und so Endbenutzer in die Lage versetzen, Vorgängerversionen von Dateien auf einfache Weise anzuzeigen und wiederherzustellen.
Quelle: aws.amazon.com
AI-Powered Health Data Masking ist eine Lösung, die Unternehmen im Gesundheitswesen bei der Identifizierung und Maskierung gesundheitsbezogener Daten in Bildern oder Texten unterstützt. Selbst wenn mit dieser Lösung keine Garantie für die Übereinstimmung mit behördlichen Frameworks einhergeht, wurde sie mit dem Ziel konzipiert, als Teil einer Reihe von Abmilderungskontrollen in Ihrer Umgebung implementiert zu werden.
Quelle: aws.amazon.com

Today we are announcing a preview of a new feature of Azure Policy. The guest configuration capability, which audits settings inside Linux and Windows virtual machines (VMs), is now ready for customers to author and publish custom content.
The guest configuration platform has been generally available for built-in content provided by Microsoft. Customers are using this platform to audit common scenarios such as who has access to their servers, what applications are installed, if certificates are up to date, and whether servers can connect to network locations.
Starting today, customers can use new tooling published to the PowerShell Gallery to author, test, and publish their own content packages both from their developer workstation and from CI/CD platforms such as Azure DevOps.
For example, if you are running an application on an Azure virtual machine that was developed by your organization, you can audit the configuration of that application in Azure and be notified when one of the VMs in your fleet is not compliant.
This is also an important milestone for compliance teams who need to audit configuration baselines. There is already a built-in policy to audit Windows machines using Microsoft’s recommended security configuration baseline. Custom content expands the scenario to content from a popular source of configuration details, group policy. There is tooling available to convert from group policy format to the desired state configuration syntax used by Azure Policy guest configuration. Group policy is a common format used by organizations that publish regulatory standards, and a popular tool for enterprise organizations to manage servers in private datacenters.
Finally, customers that are publishing custom content packages can include third party tooling. Many customers have existing tools used for performing audits of settings inside virtual machines before they are released to production. As an example, the gcInSpec module is published as an open source project with maintainers from Microsoft and Chef. Customers can include this module in their content package to audit Windows virtual machines using their existing investment in Chef InSpec.
For more information, and to get started using custom content in Azure Policy guest configuration see the documentation page ”How to create Guest Configuration policies.”
Quelle: Azure
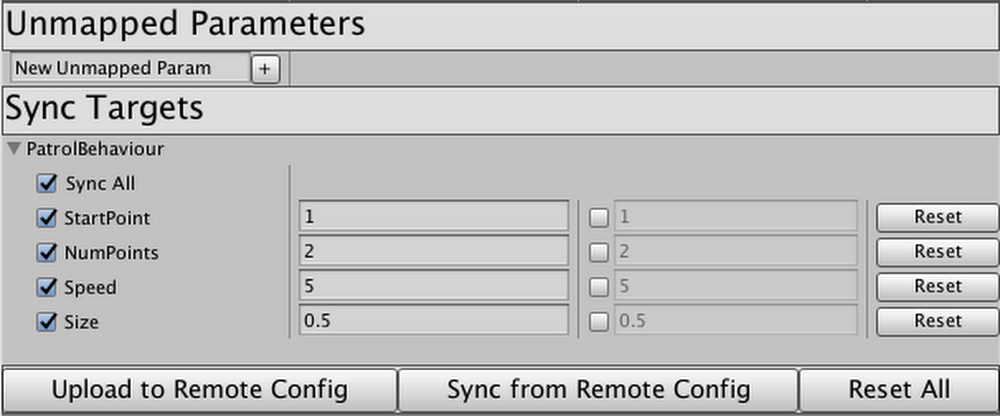
Last June we announced Firebase Unity Solutions, an open-source Github repository with sample projects and scripts to help you add cloud-based features to your games being built on Unity. Our debut project,Firebase_Leaderboard, utilized Firebase Realtime Database to create and manage a cross-platform high score leaderboard. Today, we’re introducing the second solution incorporating Firebase services into Unity: Auto-Sync with Remote Config.Auto-Sync uses Firebase’s Remote Config to allow Unity developers to modify their game’s behavior in real time, without requiring a fresh build and release cycle. This means you can tweak the behavior of entities in your game without waiting for builds to be processed through the app stores. In days past, making incremental changes to game behavior in real time required a good bit of setup. Firebase Remote Config is an outstanding tool for updating behavior without requiring a new publish cycle, but the Unity library requires hard-coding every single variable a developer wants to control.With this package, you can pop the provided Component onto any GameObject or Prefab, tweak how to identify the fields you want remote access to, and click “Upload to Remote Config.” When the game is live, you can modify those values right in a custom Unity Editor built using Remote Config Management REST API, click “Upload” again, and voilà: the live game updates right before your eyes!Think your platformer hero’s jump should be a little higher? Want your patrolling enemies to move a bit faster? How about modifying the density of powerups, ammo, or obstacles? Or disabling features in a marketplace until translations are ready, or toggling a promotion during a very specific time window? The possibilities are limitless; with Auto-Sync, this can all be done right from the Editor at a moment’s notice. No code push required.To learn more, visit theFirebase Unity Solutions repository on Github. You can incorporate the scripts into your project directly, or import the unitypackage file from the current-builds subdirectory to get started.
Quelle: Google Cloud Platform

Azure Migrate is focused on streamlining your migration journey to Azure. We recently announced the evolution of Azure Migrate, which provides a streamlined, comprehensive portfolio of Microsoft and partner tools to meet migration needs, all in one place. An important capability included in this release is upgrades to Server Assessment for at-scale assessments of VMware and Hyper-V virtual machines (VMs.)
This is the first in a series of blogs about the new capabilities in Azure Migrate. In this post, I will talk about capabilities in Server Assessment that help you plan for migration of Hyper-V servers. This capability is now generally available as part of the Server Assessment feature of Azure Migrate. After assessing your servers for migration, you can migrate your servers using Microsoft’s Server Migration solution available on Azure Migrate. You can get started right away by creating an Azure Migrate project.
Server Assessment earlier supported assessment of VMware VMs for migration to Azure. We’ve now included Azure suitability analysis, migration cost planning, performance-based rightsizing, and application dependency analysis for Hyper-V VMs. You can now plan at-scale, assessing up to 35,000 Hyper-V servers in one Azure Migrate project. If you use VMware as well, you can discover and assess both Hyper-V and VMware servers in the same Azure Migrate project. You can create groups of servers, assess by group, and refine the groups further using application dependency information.
Azure suitability analysis
The assessment determines whether a given server can be migrated as-is to Azure. Azure support is checked for each server discovered. If it is found that a server is not ready to be migrated, remediation guidance is automatically provided. You can customize your assessment and regenerate the assessment reports. You can apply subscription offers and reserved instance pricing on the cost estimates. You can also generate a cost estimate by choosing a VM series of your choice, and specify the uptime of the workloads you will run in Azure.
Cost estimation and sizing
Assessment reports provide detailed cost estimates. You can optimize on cost using performance-based rightsizing assessments. The performance data of your on-premise server is taken into consideration to recommend an appropriate Azure VM and disk SKU. This helps to optimize and right-size on cost as you migrate servers that might be over-provisioned in your on-premise data center.
Dependency analysis
Once you have established cost estimates and migration readiness, you can go ahead and plan your migration phases. Use the dependency analysis feature to understand the dependencies between your applications. This is helpful to understand which workloads are interdependent and need to be migrated together, ensuring you do not leave critical elements behind on-premises. You can visualize the dependencies in a map or extract the dependency data in a tabular format. You can divide your servers into groups and refine the groups for migration using this feature.
Assess your Hyper-V servers in three simple steps:
Create an Azure Migrate project and add the Server Assessment solution to the project.
Set up the Azure Migrate appliance and start discovery of your Hyper-V virtual machines. To set up discovery, the Hyper-V host or cluster names are required. Each appliance supports discovery of 5,000 VMs from up to 300 Hyper-V hosts. You can set up more than one appliance if required.
Once you have successfully set up discovery, create assessments and review the assessment reports.
Use the application dependency analysis features to create and refine server groups to phase your migration.
Note that the inventory metadata gathered is persisted in the geography you select while creating the project. You can select a geography of your choice. Server Assessment is available today in Asia Pacific, Australia, Azure Government, Canada, Europe, India, Japan, United Kingdom, and United States geographies.
When you are ready to migrate the servers to Azure, you can use Server Migration to carry out the migration. You will be able automatically carry over the assessment recommendations from Server Assessment into Server Migration. You can read more in our documentation “Migrate Hyper-V VMs to Azure.”
In the coming months, we will add assessment capabilities for physical servers. You will also be able to run a quick assessment by adding inventory information using a CSV file. Stay tuned!
In the upcoming blogs, we will talk about tools for scale assessments, scale migrations, and the partner integrations available in Azure Migrate.
Resources to get started
Tutorial on how to assess Hyper-V servers using the server assessment feature of Azure Migrate.
Prerequisites for assessment of Hyper-V servers.
Guide on how to plan an assessment for a large-scale environment. Each appliance supports discovery of 5,000 VMs from up to 300 Hyper-V hosts.
Tutorial on how to migrate Hyper-V servers using the Server Migration feature of Azure Migrate.
Quelle: Azure

In all of the excitement and buzz around Kubernetes, one important factor in the conversation that seems to be glossed over is how and where containerized applications are built. Going back to Docker’s roots, it was developers who were the first ones to adopt Docker containers. It solved their own local development issues and made it easier and faster to get applications out the door.
Fast forward 5 years, and developers are more important than ever. They build modern apps and modernize existing apps that are the backbone of organizations. If you’re in IT operations and selecting application platforms, one of the biggest mistakes you can make is making this decision in isolation, without development buy-in.
Avoiding Shadow IT, Round 2
In the early days of public cloud, developers started going around IT to get fast access to computing resources, creating the first round of “Shadow IT”. Today, most large enterprises have embraced cloud applications and infrastructure, and work collaboratively across application development and operations teams to serve their needs.
But there’s a risk we’ll invite the same thing to happen again by making a container platform decision that doesn’t involve your developers. Here are 3 reasons to include developers in your platform decisions.
1. Intuitive Tooling = Developer Productivity
Developers are resourceful, but they want tools and solutions that are simple and “just work”; it makes their job easier. They want familiar tools, where they can invoke commands they know well. This translates into greater productivity and more energy being put towards innovation. Some enterprises even measure developer onboarding time as a performance indicator.
Millions of developers use Docker Desktop already because it works with standard Docker and Kubernetes CLIs, without new commands to learn or workflows to master. They can integrate directly with their IDE and CI tools without having to relearn how to build apps.
With Docker Desktop Enterprise, developers can create a local, certified Kubernetes environment with a single click. We make it even simpler to build containerized applications for those without prior Docker knowledge with the new Application Designer GUI and customizable application templates.
Ensuring your application platform works consistently with your developers’ tools will ensure tighter integration between the groups.
2. Platform for Today & Tomorrow
For many enterprises, the technology stacks of yesterday are not the ones in use today; and the technology stacks of tomorrow will likely be different than what is being used today. In the search to improve developer productivity, development teams also explore new application stacks that make their job easier – new languages, new frameworks and architectures, new operating systems. New platforms enter the mix this way.
Put another way, your development teams want to pick and choose the right tools for the job and not be forced into using a single operating system or language. If you can give them choice and flexibility to use the platforms that best suit their need, you can avoid the second wave of “shadow IT.” This will also help operations teams who wish to have flexibility in where applications are deployed – whether that is on-premises, virtual or bare metal, or in one or more public clouds.
The Docker Platform provides a fully agnostic approach to containerization – supporting any language or framework and any infrastructure. With the new Docker Application packaging framework, we also look to extend beyond containers and support applications that may include cloud-based services and serverless functions down the road.
3. Intrinsic Security
Everyone knows security is important, but it’s often seen as a hindrance to developer productivity. Operations teams can help developers build secure applications by providing guardrails and governance models that are built into the development lifecycle.
One of the best ways to do this is by providing pre-approved application templates to your developers. These are the scaffolding of modern applications that have security intrinsically built-in. They leverage approved technology stacks that are pre-screened for known vulnerabilities, ensuring that all patches are in place. Docker Desktop Enterprise and Docker Trusted Registry combine to provide these capabilities so that your developers can ship production-ready code faster.
The Proof is in the Results
Application platform investments can often stall or just don’t see much adoption. Working closely with your application architects and development teams ensures that your investments in Kubernetes and a container platform will not go to waste. Our experience with over 800 enterprise organizations who rely on Docker Enterprise demonstrates how organizations that can bring Dev and Ops together improve collaboration and drive more value than those that do not.
Don’t pick an ops platform your devs won’t use. Here are 3 reasons to include #developers in your platform decisions:Click To Tweet
Start a Free Trial
To learn more about building, sharing, and running modern applications:
Try a free, hosted trial or catch our Docker Enterprise 3.0 Launch Webinar Series
If you’re attending VMworld in San Francisco, stop by booth #1969 and learn more about how we’re enabling modern application delivery
Learn more about the Docker Kubernetes Service
The post Don’t Pick an Ops Platform Your Devs Won’t Use appeared first on Docker Blog.
Quelle: https://blog.docker.com/feed/

Today we are announcing that IoT Plug and Play is now available in preview! At Microsoft Build in May 2019, we announced IoT Plug and Play and described how it will work seamlessly with IoT Central. We demonstrated how IoT Plug and Play simplifies device integration by enabling solution developers to connect and interact with IoT devices using device capability models defined with the Digital Twin definition language. We also announced a set of partners who have launched devices and solutions that are IoT Plug and Play enabled. You can find their IoT Plug and Play certified devices at the Azure Certified for IoT device catalog.
With today’s announcement, solution developers can start using Azure IoT Central or Azure IoT Hub to build solutions that integrate seamlessly with IoT devices enabled with IoT Plug and Play. We have also launched a new Azure Certified for IoT portal, for device partners interested to streamline the device certification submission process and get devices into the Azure IoT device catalog quickly.
This article outlines how solution developers can use IoT Plug and Play devices in their IoT solutions, and how device partners can build and certify their products to be listed in the catalog.
Faster device integration for solution developers
Azure IoT Central is a fully managed IoT Software as a Service (SaaS) offering that makes it easy to connect, monitor, and manage your IoT devices and products. Azure IoT Central simplifies the initial setup of your IoT solution and cuts the management burden, operational costs, and overhead of a typical IoT project. Azure IoT Central integration with IoT Plug and Play takes this one step further by allowing solution developers to integrate devices without writing any embedded code. IoT solution developers can choose devices from a large set of IoT Plug and Play certified devices to quickly build and customize their IoT solutions end-to-end. Solution developers can start with a certified device from the device catalog and customize the experience for the device, such as editing display names or units. Solution developers can also add dashboards for solution operators to visualize the data; as part of this new release, developers have a broader set of visualizations to choose from. There is also the option to auto generate dashboards and visualizations to get up and running quickly. Once the dashboard and visualizations are created, solution developers can run simulations based on real models from the device catalog. Developers can also integrate with the commands and properties exposed by IoT Plug and Play capability models to enable operators to effectively manage their device fleets. IoT Central will automatically load the capability model of any certified device, enabling a true Plug and Play experience!
Another option available for developers who’d like more customization is to build IoT solutions with Azure IoT Hub and IoT Plug and Play devices. With today’s release, Azure IoT Hub now supports RESTful digital twin APIs that expose the capabilities of IoT Plug and Play device capability models and interfaces. Developers can set properties to configure settings like alarm thresholds, send commands for operations such as resetting a device, route telemetry, and query which devices support a specific interface. The most convenient way is to use the Azure IoT SDK for Node.js (other languages are coming soon). And all devices enabled for IoT Plug and Play in the Azure Certified for IoT device catalog will work with IoT Hub just like they work with IoT Central.
Streamlined certification process for device partners
The Azure Certified for IoT device catalog allows customers to quickly find the right Azure IoT certified device to quickly start building IoT solutions. To help our device partners certify their products as IoT Plug and Play compatible, we have revamped and streamlined the Azure Certified for IoT program by launching a new portal and submission process. With the Azure Certified for IoT portal, device partners can define new products to be listed in the Azure Certified for IoT device catalog and specify product details such as physical dimensions, description, and geo availability. Device partners can manage their IoT Plug and Play models in their company model repository, which limits access to only their own employees and select partners, as well as the public model repository. The portal also allows device partners to certify their products by submitting to an automated validation process that verifies correct implementation of the Digital Twin definition language and required interfaces implementation.
Device partners will also benefit from investments in developer tooling to support IoT Plug and Play. The Azure IoT Device Workbench extension for VS Code adds IntelliSense for easy authoring of IoT Play and Play device models. It also enables code generation to create C device code that implements the IoT Plug and Play model and provides the logic to connect to IoT Central, without customers having to worry about provisioning or integration with IoT Device SDKs.
The new tolling capabilities also integrates with the model repository service for seamless publishing of device models. In addition to the Azure IoT Device Workbench, device developers can use tools like the Azure IoT explorer and the Azure IoT extension for Azure Command-line Interface. Device code can be developed with the Azure IoT SDK for C and for Node.js.
Connect sensors on Windows and Linux gateways to Azure
If you are using a Windows or Linux gateway device and you have sensors that are already connected to the gateway, then you can make these sensors available to Azure by simply editing a JSON configuration. We call this technology the IoT Plug and Play bridge. The bridge allows sensors on Windows and Linux to just work with Azure by bridging these sensors from the IoT gateway to IoT Central or IoT Hub. On the IoT gateway device, the sensor bridge leverages OS APIs and OS plug and play capabilities to connect to downstream sensors and uses the IoT Plug and Play APIs to communicate with IoT Central and IoT Hub on Azure. A solution builder can easily select from sensors enumerated on the IoT device and register them in IoT Central or IoT Hub. Once available in Azure, the sensors can be remotely accessed and managed. We have native support for Modbus and a simple serial protocol for managing and obtaining sensor data from MCUs or embedded devices and we are continuing to add native support for other protocols like MQTT. On Windows, we also support cameras, and general device health monitoring for any device the OS can recognize (such as USB peripherals). You can extend the bridge with your own adapters to talk to other types of devices (such as I2C/SPI), and we are working on adding support for more sensors and protocols (such as HID).
Next steps
Read IoT Central documentation to learn how to build solutions with IoT Plug and Play devices.
Read the IoT Plug and Play documentation to learn how to build solutions using the Azure IoT platform.
Learn how to build and certify IoT Plug and Play devices.
View the Digital Twin Definition Language specification on GitHub.
Tune in to the Internet of Things Show deep dive on September 11.
Browse IoT Plug and Play devices on the Azure IoT Device Catalog.
See a demo of IoT Plug and Play bridge with a MODBUS environmental sensor on the Channel 9 IoT Show.
Try IoT Plug and Play bridge on GitHub.
Learn how to implement IoT spatial analytics using Azure Maps and IoT Plug and Play location schema.
Quelle: Azure

A lot of enterprises are evolving their monolithic applications into microservices architectures. In this pattern, applications are composed of fine-grained services that communicate via APIs. Microservices promise, faster development, innovation, cloud scaling, better infrastructure optimization—and happier developers. No wonder this architecture gets so much attention. But that doesn’t mean implementing a microservices strategy is easy (If you’re in the middle of this process, you know it’s complicated). You’ve got lots of different departments working on lots of different projects, and all of them are at different places. How do companies get to a point where they can reap the benefits of microservices?In this post, we’ll explain why a successful microservices approach requires dedicated infrastructure for building and managing those services, how sharing access to services happens through APIs, and why APIs shared outside the domain of ownership need to be managed. We’ll also walk through how Istio, an open-source project that can help with microservices management, helps to control the potential chaos as microservices adoption spreads through an organization.APIs as communication contractCooperating services intercommunicate via APIs. Simply put, APIs are how software talks to software. The API defines the communication contract between a service provider and a service consumer. Whether you think of the provider and the consumer as “services,” or as “applications” is immaterial; the API defines how they make requests and receive responses. Sending and receiving JSON RESTfully over HTTP/1 seems to be the most common technical basis for an API, but APIs can also employ HTTP/2 or TCP, and may use gRPC, GraphQL, jsonRPC or other data and message representations. They’re all just APIs, and they may be more or less formally specified.When an application is “decomposed” into a set of services that intercommunicate via APIs, a new set of problems arises: how to manage all of those interdependent services and the communication between them. As the set of services or the number of instances grows, the service management problem grows, too.For example, one of the very first things to consider when building with microservices is the ability to secure traffic between the microservices. A common method for securing this communication is mutual transport layer security (mTLS), which enables both peers in an exchange to authenticate one another. Once authentication happens, this can be used to perform authorization decisions at the service that receives a request, based on the identity of the caller that’s been asserted with the TLS certificate. This important function is pretty basic and simple to do when you have two services, but it gets more and more difficult when the number of services grows. One might attempt to mitigate this with client libraries.But then there’s the reality that services are developed in various languages: Java, C#, Python, Golang, or Node.js. It gets very difficult to apply a variety of different policies if it requires independent implementations in a set of five distinct languages. The complications multiply, and it becomes obvious that we need a better model: some kind of management infrastructure to control the potential chaos.Enter the service mesh While the term “microservices architecture” refers to a general pattern, a service mesh is a particular realization of that pattern. A service mesh provides a transparent and language-independent way to flexibly and easily automate application network functions. (For more on service mesh, check out this blog series.)Simply put, services meshes were developed to solve the problems of connecting, securing, controlling, and observing a mesh of services. Service meshes handle service-to-service interactions including load balancing, service-to-service authentication, service discovery, routing, and policy enforcement. Istio is an open-source project that delivers a service mesh; it’s backed by Google, IBM, Red Hat, Lyft, Cisco, and others, and is being used in production by companies like eBay, Autotrader, Trulia, Continental, and HP.Istio aims to help connect, secure, control, and observe the services in the mesh.Connect Istio helps control the flow of traffic and API calls between services intelligently; services connect to their dependent services via names, and load automatically gets balanced across all of the available runtime instances of a target service. Retries, circuit breakers, canary releases—all are handled automatically and configured for the mesh.Secure Istio automatically secures communications between services through managed authentication, authorization, and encryption. Each service has an identity asserted by an X.509 certificate that is automatically provisioned and used to implement two-way (mutual) Transport Level Security (TLS) for authorization and encryption of all API exchanges. Control Istio applies policies (for example, routing, rate limits, quotas) and enforces them across services. Inbound and outbound communications are controlled—even requests that go to external systems.Observe Istio ensures visibility with automatic tracing and operational logging of services.The goal of using a service mesh like Istio with your microservices system is better security, more reliability, lower cost, scale, and better resiliency within a set of closely intercommunicating systems. A look at services in a meshSuppose an application is a custom inventory management system for a retailer, composed of several cooperating, related services:Policies defined in the service mesh might dictate that the pricing service can make outbound calls only to its data store, while the product service can call the location and inventory and pricing services, but not anything else. If the team uses Kubernetes as the underlying platform for these services, Kubernetes ensures that unhealthy instances of these services get stopped and new instances get started. The service mesh ensures that the new instances are governed by the same set of policies.Sharing APIs with consumers outside the meshService meshes generally focus on the problem of managing and controlling the intercommunication among all the disparate services that comprise the application. Surely, it’s possible to define an Istio gateway to accept inbound requests. But that’s not enough; there’s a need to manage the requests into the mesh from service consumers, and to manage outbound requests—perhaps to a SaaS CRM system or another externally managed service.Back to our example: the product service needs to accept inbound requests from clients, such as an app running on hundreds of thousands of mobile phones. But the product service might want to modify its behavior based on the identity of the user making the call. The app on the mobile phone uses the “Product API”—the communication contract exposed by the product service—to send in requests. The product service might also need to connect to a Salesforce system.Regarding inbound requests arriving from systems that are significantly separated from the services in the mesh, how should those requests be secured, controlled, and managed? (Examples of “significantly separated” could include requests from third-party apps or even from different business units or teams within the same company. The requirements for these separated systems are quite different from those for inter-service communication). For an external or mobile client, we cannot rely solely on a TLS certificate to assert the identity of the inbound request. While app producers can provision client certificates into mobile apps, in many cases the client has no certificate to use for transport-level security. Clients may use a different form of identity assertion, relying on message-level security and signing, such as a self-signed JWT.Often the system would also like to authenticate the identity of a human user. Within the service mesh, the service identity is the only identity, but requests arriving from a mobile app, kiosk, or web app should carry user identity as well. This generally isn’t done with an X.509 certificate, but rather with a token (think OAuth) that asserts identity information about the user.Rate limits for external consumers will be different, and may depend on the status of the developer of the consumer app (or “client”). For example, client apps built by partners might get greater rights and higher transaction allowances. These limits are often used for business purposes or may be in place to protect an entire system rather than an individual service.It may be desirable to modify or filter the original API requests and responses depending on the client’s use case, or the user’s identity. For example, a lightweight client might want a compressed data format in lieu of JSON. Or a client might want a filtered view of the JSON, with some of the fields returned and some omitted.These different requirements apply to externally-developed apps, and in general to any client or service consumer that is significantly separated from the target services. Verification and throttling of requests coming from a client built by a developer on the service-development team is less useful; if the client app (or consuming service) is misbehaving, the API publishing team can notify their internal partners, and that client app development team just gets to work and fixes it. But calls arriving from a client built by an external partner need more verification. It’s not practical to engage on a 1:1 basis with developers of external apps. More strict enforcement is necessary here; that’s where API management come in.API management enables the sharing of APIsSharing a microservice means exposing it as an API for use by a developer outside the team that built the service. Microservice APIs that are shared outside of a small team need to be managed. An API management infrastructure, such as Google Cloud’s Apigee API management platform, helps address the different requirements for requests that are sent from external systems. Apigee also supports Istio as an API gateway or enforcement point. API management enables you to:Share APIs by publishing them and making them available to developers outside the core app team. These external developers need to gain authorization to access the APIs and understand how to use the APIs to build their own apps and clients. The core app team wants a way to distinguish clients built by different developers, and even distinguish between clients built by the same developer. This is all enabled by a developer portal, and the ability for developers to self-register and self-provision credentials for the APIs.Productize by treating APIs as “digital products.” This means: collecting related APIs into a coherent, consumable unit, to enable publishing and sharing. grouping complementary APIs that may have disparate origins into a single unit and normalizing security requirements on those APIs (rate limits, security credentials, message signing, and so on). modernizing APIs by transforming SOAP to JSON, implementing caching, or wrapping validation logic around “bare” or naive internal APIs. potentially monetizing APIs directly, charging developers for inbound traffic.Report on usage trends, traffic splits, latency and user experience. This enables the API product team to feed insights back into the API’s design, to iterate on the API-as-digital-product—and maximize business value. This capability is built on an analytics subsystem that scales.Comparing API management to service managementServices management and API management are different. A typical large, information-driven enterprise will deliver thousands of services, and will share hundreds of those via APIs to outsiders. Service management and API management satisfy the needs in these different spheres:A mature enterprise might aspire to the following goals:All services will be managed; they’ll have consolidated logging, tracing, mTLS, and retry policies applied and enforced. Access to services is via loosely governed APIs.All APIs shared outside their original ownership domain will be managed. Developers external to the team can view them, request access to them, and gain credentials. And access from apps built by external developers will be more strictly governed and throttled. Analytics data will help inform modifications to shared APIs. But there are some logical parallels between the capabilities in service meshes like Istio and API management platforms like Apigee. Both Istio and Apigee:Enable policy enforcement for requests (rate limiting, quotas, and token verification)Can perform request routing based on data in the requestCollect logging information for observabilityUse a communication proxy to implement these controlsHowever, these two systems are targeted to different needs. Services management is intended for services built by a more or less closely related development team. This includes some aspects of managing the communication among those services, for example, mutual-TLS enforcement and automatic certificate provisioning, or rate limiting, or routing.On the other hand, API management is intended primarily to manage sharing of APIs outside of a core team. An outsider might be a member of the team across the hall, a developer in a different division of your company, or a developer at a different company. In any case there is significant separation between the API consumer and the API provider, which demands a greater degree of management of the API. While technically there are parallels, the requirements are different enough that, especially as the number of services under management grows, and as the number of APIs shared beyond their publishing teams grows, companies will want dedicated infrastructure to manage each.How HP manages microservicesHP Inc., which sells a wide range of printing solutions to consumers and enterprises, builds a variety of core services that are shared across business units at the company, including identity management and content management. The decision to move to a microservices architecture was driven in large part by the need to move faster, says Galo Gimenez-Palop, distinguished technologist and platform architect at HP. Large teams working on applications from different functional areas created the need for lots of synchronization—and lots of meetings. “We had these continuous integration pipelines that would take hours. And because there were so many dependencies, there were manual gates to decide if something was moving or not moving forward,” Gimenez-Palop tells us.So it’s no surprise that HP was attracted to the increased development velocity promised by a microservices architecture. Adopting microservices (alongside Kubernetes container orchestration, which accelerated teams building and deploying applications) would enable smaller development teams working on smaller code bases, with services going into production independently to reduce reliance on other teams—“you build it, you run it,” as Gimenez-Palop puts it. Yet moving from monolithic applications to a more distributed microservices architecture posed several challenges—especially as the number of microservices grew. The stumbling blocks mounted, Gimenez-Palop says: from orchestration difficulties, to challenges in discovering services, to breakages resulting from modifying services that depend on other services, to “policy sprawl,” to issues with ensuring that new versions of services integrate with other services.“How do you know which is the other version of the other service and when the other team changes the version of the service?” Gimenez-Palop asks. “Integration testing became really, really difficult because now, when you release one of the services, you need to do the integration testing with a bunch of other testing other services.”“As soon as you start to do microservices, you will find that it’s very easy to get in a complicated mess,” he adds.Istio proved to be the solution for HP. It simplified the complexities of microservices communications by providing a standardized way to connect, secure, monitor, and manage microservices. As a vital plane for service-to-service control and reliability, Istio handles application-layer load balancing, routing, and service authentication.Sharing microservices-based core services with other business units within HP is done by exposing them as APIs with other teams in the organization or with external partners and developers.But when microservices are exposed as APIs, they require API management, which makes it easier to extend the value of microservices both within the enterprise and to external developers. HP uses the Apigee platform for this purpose, gaining security, visibility, and control along the way.“We can have written contracts with the consumers of our APIs, we can have visibility into how those consumers are using the APIs of different services,” Gimenez-Palop says. “We can have policies like authorization, authentication, and payload inspection, all centralized in a single location.”Learn more by watching the Google Cloud NEXT ‘19 session:Can I use services management alone?As services become more prevalent and more fine-grained within an enterprise, formal service management via dedicated service mesh infrastructure will become a requirement.But is a service mesh alone enough? Sometimes. In the case where all of the inter-cooperating services are built and managed under the same ownership domain (a company’s director of engineering, for example), and access to the services is rarely shared with outsiders (other teams) via exposed APIs, a service mesh such as Istio will likely satisfy the requirements. Clients to the services are all in-house and don’t have significant separation from the services themselves.If services expose an externally consumable API that outsiders can see and use, then API management (as Gimenez-Palop says above) becomes a natural complement to service management. Better togetherMicroservices continues to be a big idea. A successful microservices approach requires tooling and infrastructure for building and managing those services. Sharing access to services happens through APIs, and APIs shared outside the domain of ownership need to be managed. Drawing the line between what is inside the domain of ownership and what is outside, and therefore which API calls need less management and which need more, is a judgment call. Service meshes and API management are complementary and are used to solve distinct problems around services and APIs. While they both use communication proxies, and while there are parallels in function, the differences in domain set them apart, and most companies will see significant benefits from using them together.For more, watch Dino and Greg’s popular presentation at Google Cloud NEXT ‘19, “APIs, Microservices, and the Service Mesh.”
Quelle: Google Cloud Platform
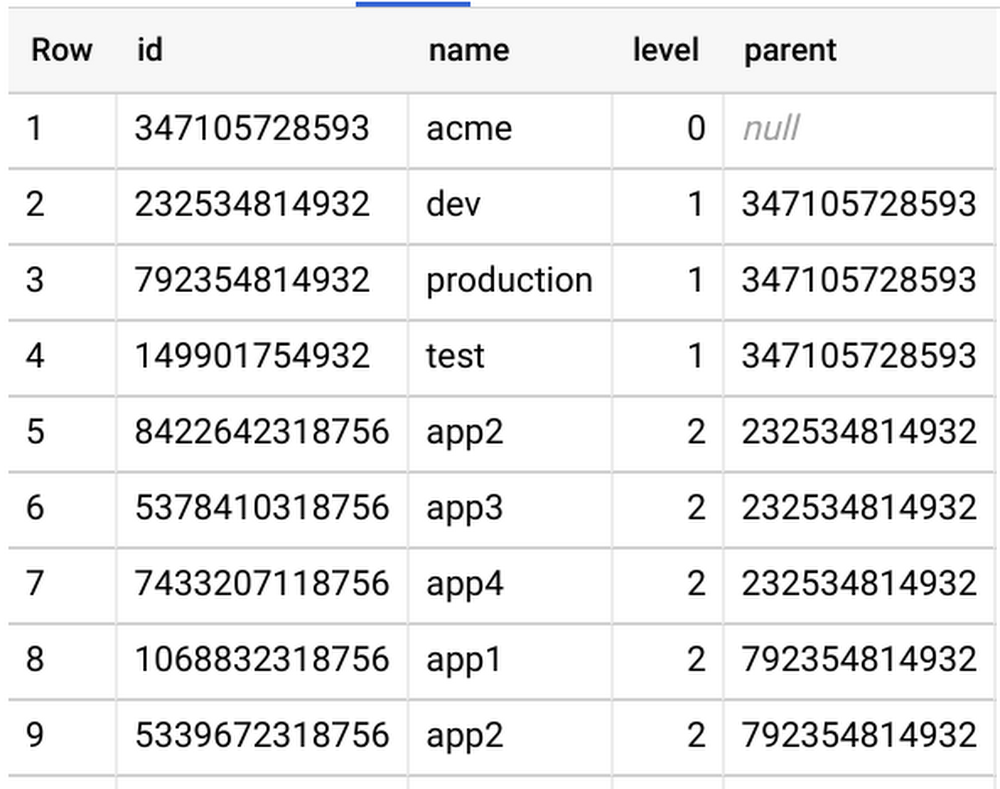
Effectively managing and reporting on costs is a critical part of financial stewardship, whether you’re running a multi-billion-dollar enterprise business or small household budget. But making data-driven decisions on how to cut costs or double down on a business venture all starts with collecting the data you’ll need to inform those decisions. At Google Cloud Platform (GCP), one of our goals is to help customers make data-driven decisions about their cloud costs and usage. You can do this through multiple native capabilities available in the Cloud Console, including Billing reports, budgets and alerts, configurable quotas, resource hierarchies, and Billing export. While costs per project, product, and SKU are available via our native Billing reports, we often hear that enterprises face a challenge when reporting comprehensive spend, KPIs, and cost of goods sold (COGS) per team or department, which often involves more comprehensive data. Fortunately, detailed GCP Billing data is easily exportable into BigQuery and visualized with a BI tool like Data Studio so you can do more detailed analysis. Right now, GCP folder hierarchies (denoted as project.ancestry_numbers in the Billing export) only reflect their numerical and immutable ID form rather than their folder name (i.e., a GCP project under folder /acme/production/app1 is reflected by something like /720879011932/792354814932/1068832318756).To make it easier to allocate costs across departments, teams, cost centers, etc., we’ve put together this solution. Read on to see how to convert IDs into folder names so you can more easily track and analyze costs.Generating folder hierarchy namesTo convert your Billing export’s project.ancestry_numbers into something human-readable, you’ll first need a key that will map ancestry numbers like 720879011932 into the folder name “acme,” and a way to link parent/child folders.Using our native tools to view your folder structure is simple for one-off requests via the Cloud Console or gcloud CLI, or by API, but it can be complex if your enterprise organization is built from dozens of departments, teams, and hierarchical structures. To make this process even simpler, consider using a GitHub tool like folder-lookup, which uses Cloud Functions to programmatically crawl your organization’s folder structure and create a folder-structure key directly in BigQuery. After running this tool, you’ll see a simple folder-structure key to join against your Billing export, like so:Enhancing your BigQuery Billing exportThe next step is to convert Folder IDs into Folder Names within your Billing export. In order to cut down costs (i.e., the total amount of data queried), we’ll run this query only once per day via a scheduled BigQuery query. This query joins the previous day’s Billing export to this folder-structure key and appends a running Billing export with a folder data table. If data freshness is a high priority for you, you can easily modify the scheduled query to pull data on a more regular cadence (you’ll also have to alter the line ”WHERE _PARTITIONDATE = DATE_SUB(current_date(), INTERVAL 1 DAY)”).The query runs against the previous day’s data, so here we’ll run the scheduled query at 7 a.m. every day to get a full picture of the previous day’s spend. Note that the below query assumes a maximum folder depth of four, so it may have to be slightly augmented to meet your requirements.After running this query, you’ll see there’s now more detailed information on spend per department, and it’s easier to aggregate costs by environment or application.And thanks to Data Studio, visualizing this data is a piece of cake too:Monitoring your company’s cloud spend is crucial for quickly catching issues, prioritizing resources, and making better financial decisions. GCP provides tools to help you conduct a comprehensive analysis of your costs with Billing reports, Billing export, and Data Studio. And thanks to BigQuery’s powerful capabilities, crunching big data and using these insights to make data-driven decisions has never been easier. To see more options for BigQuery Billing export queries, check out our billing query example guide.
Quelle: Google Cloud Platform